New here? Start with Affiliate Marketing 101, grab the Starter Kit, and follow the Step-by-Step Website Guide. For platform tips, see Wealthy Affiliate Training Tips.
In this guide, we’ll show you how to speed up blog graphics with Canva, enabling you to create stunning visuals efficiently.
TL;DR: Use a small set of reusable Canva templates, a simple brand kit, and bulk-creation to speed up blog graphics so every post gets clean, on-brand visuals without hours of tinkering.
- Build five core templates (featured, Pinterest, inline explainer, quote card, step card) and reuse them for every post.
- Set up a lightweight brand kit with your colors, fonts, and logo so designs stay consistent without extra decisions.
- Use Canva’s Bulk Create to turn a simple CSV into dozens of headlines, quotes, or checklist graphics in one click.
- Follow a 15-minute sprint per post: duplicate templates, swap text and images, then export and upload.
- Keep images fast and accessible with proper sizing, compression, and descriptive ALT text.
Before You Start: What “Fast” Looks Like
- One decision per step. Templates decide fonts, spacing, and placement so you don’t.
- One tool per task. Canva for design, a CSV for text, WordPress for upload.
- Small batch, then publish. Create only what you need this week. Iterate next week.
- Good enough over perfect. Clear text, strong contrast, readable sizes. Done.
Your Five Core Templates (Build Once, Reuse Forever)
These five cover 95% of the blog needs. Build them once, name them clearly, and duplicate for each new post.
Want more help making calm, consistent visuals for your blog?
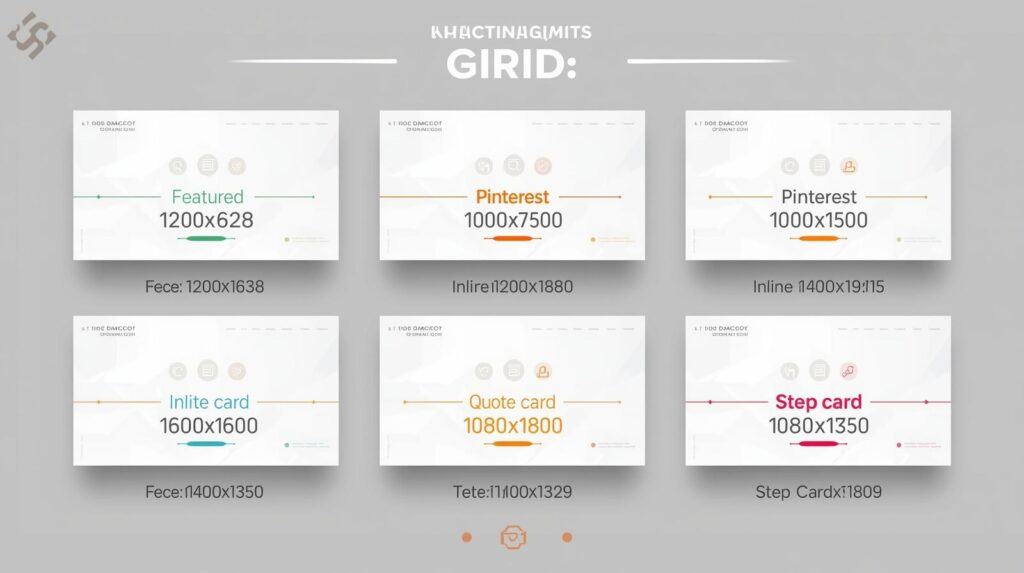
- Featured (1200×628) — For post headers/social. Layout: Large title, short subtitle, background image with a soft dark overlay. Tip: Keep margins generous; aim for 32–48px inside edges.
- Pinterest (1000×1500) — Tall pin. Layout: Big title + promise; optional 3 bullet steps. Tip: Add a subtle border to stand out in the feed.
- Inline Explainer (1200×800) — In-article diagrams or mini-checklists. Layout: H2-style heading + 3–5 bullets or side-by-side comparison boxes.
- Quote Card (1080×1080) — Pull-quotes and quick tips. Layout: Large quote, attribution below. Tip: Leave whitespace; it reads better on mobile.
- Step Card (1080×1350) — One step per card. Layout: Step number, short headline, one sentence. Tip: Great for Instagram/LinkedIn carousels.
How to Build Each Template (3 Steps)
- Choose base canvas + guides: set the exact size; show rulers/guides; add inner padding (e.g., 40px).
- Drop text boxes once: Title (H1), Subtitle (H2/H3), Footer (optional URL). Align left; avoid edge crowding.
- Add a soft overlay for readability: a black gradient 40–60% behind title; test on light and dark photos.
Set Up a Simple Brand Kit (5 Minutes)
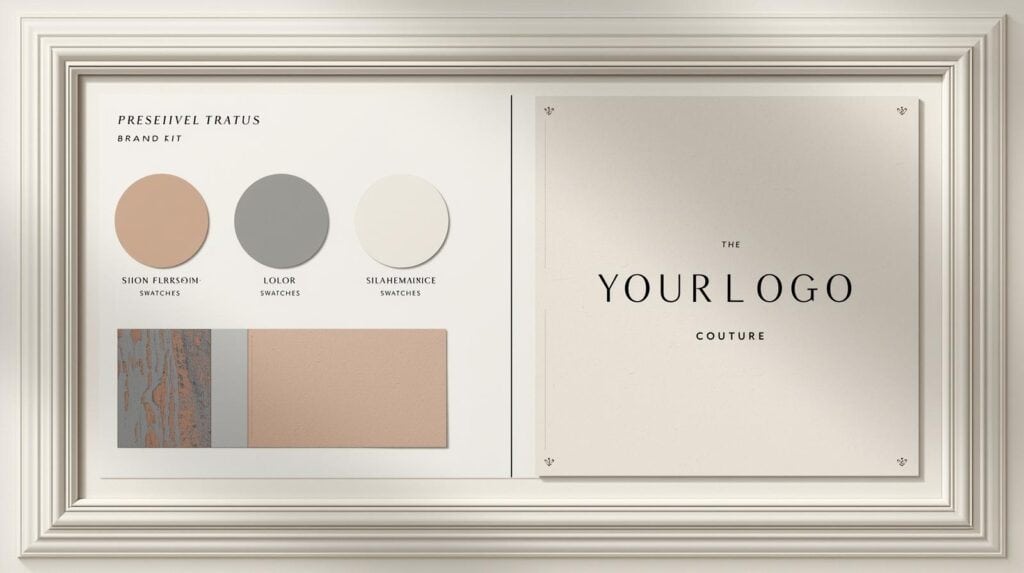
- Colors: one primary, one accent, two neutrals (body/background). Save them.
- Fonts: one for headings (bold), one for body (readable). Keep 16–20px minimum body size on images.
- Logo: if you don’t have one, use a simple text mark (your site name).
- Apply to all 5 templates: headings, buttons, borders use the same palette/sizes.
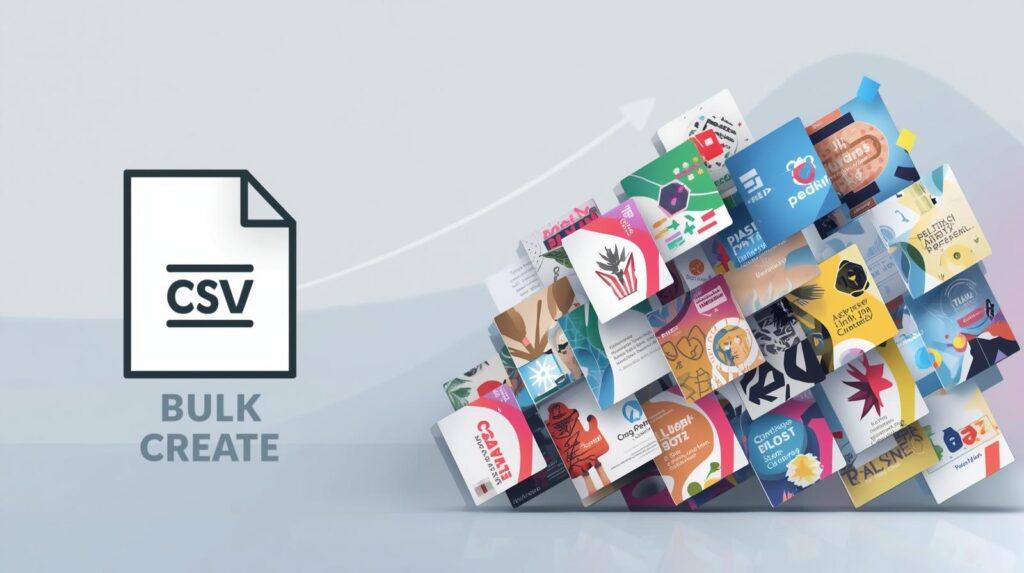
Bulk Create (Spreadsheet to Graphics)
When you have many titles or quotes, Bulk Create turns a spreadsheet into dozens of ready-to-export graphics. You map CSV columns to text fields in your template and let Canva generate variations automatically.
Ready to plug your faster graphics workflow into a bigger content plan?
Example CSV Header
Title,Subtitle,URL_Slug,BG_Image_URL
How to Speed Up Blog Graphics,5 Templates + 15-Minute Sprint,how-to-speed-up-blog-graphic-creation-with-canva,https://example.com/bg1.jpg
Beginner Keyword Research,10 Easy Topics to Publish This Week,beginner-keyword-research,https://example.com/bg2.jpg- Open your template > Bulk Create.
- Upload CSV > map Title to Title box, Subtitle to subtitle box, BG_Image_URL to background.
- Generate designs > scan for line breaks and contrast > export batch.
15-Minute Sprint SOP (Per Post)
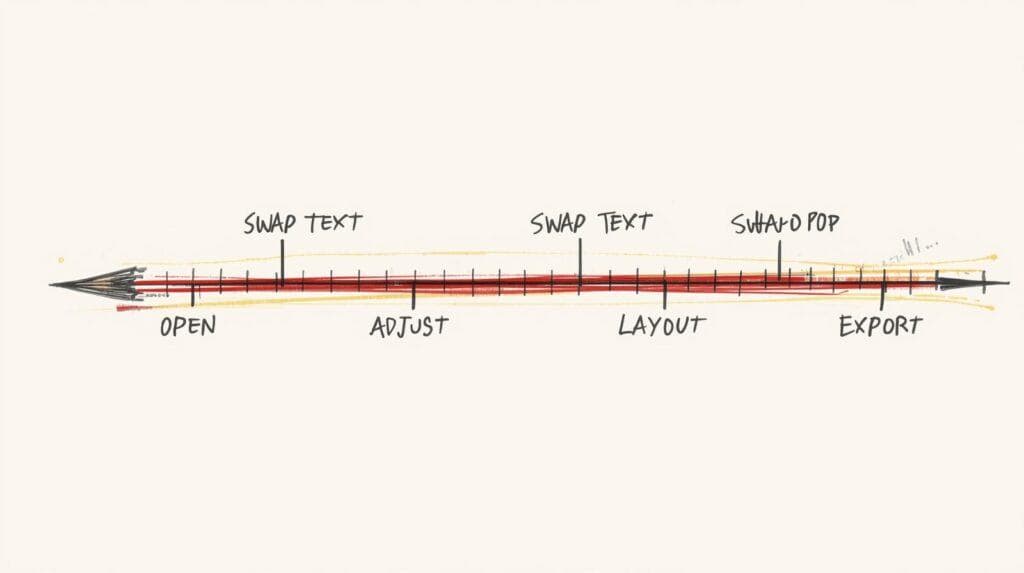
- Open Template (1 min): Featured or Inline.
- Swap Text (5 min): Paste the final title/subtitle. Check line breaks on mobile preview.
- Swap Image (3 min): Choose a high-contrast background. Add a 40–60% dark overlay if needed.
- Adjust Layout (3 min): Keep 32–48px inner margins; left-align; avoid covering faces/objects.
- Export (3 min): Consistent filename + ALT text + compression (see next section).
Export Settings to Speed Up Blog Graphics with Canva
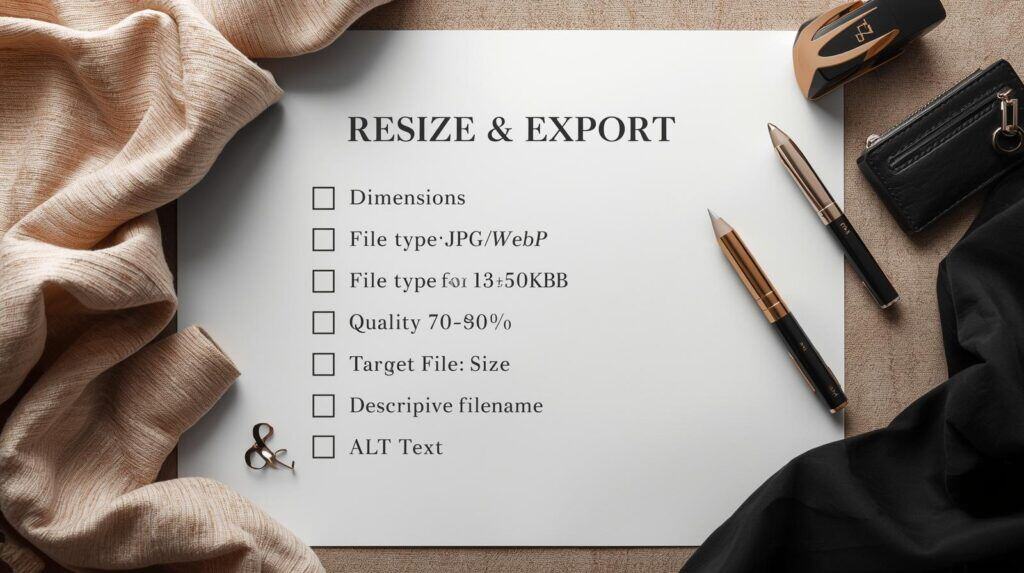
- Dimensions: 1200×628 (featured), 1200×800 (inline). Pinterest: 1000×1500.
- Format: JPG or WebP. Quality 70–80% is plenty.
- Compression: aim for < 200KB when possible. Prioritize speed over tiny detail.
- Filenames: short and descriptive (e.g., canva-templates-grid.jpg).
- ALT text: describe what’s visible and why it helps (no keyword stuffing).
Helpful External Resources for Image Speed & Accessibility
ALT Text — Quick Examples
- Good: “Five Canva templates for blog graphics—featured, Pinterest, inline, quote, step card.”
- Good: “Resize & export checklist showing dimensions, quality, compression, ALT tips.”
- Avoid: “graphic image canva blog post seo keywords” (stuffed and unhelpful).
Once your images are fast and accessible, keep strengthening the content and SEO around them:
Worked Example: Turn One Post into Four Graphics
Post: “How to Choose a Niche in 7 Steps”
- Featured: Title + subtitle over a calm desk photo; dark overlay for contrast.
- Inline Explainer: 1200×800 “7 steps” checklist with short phrases (1–3 words each).
- Quote Card: Pull-quote like “Clarity beats broadness—one reader, one problem.”
- Pinterest: Tall version with the same title + 3 micro-benefits stacked.
Time spent: ~20 minutes using templates + 5 minutes to export/compress. That’s four useful graphics without reinventing your design each time.
Troubleshooting (Fix These Fast)
- Text is hard to read: add a darker overlay, increase font size, or shorten the title.
- Everything looks crowded: increase inner margins to 40–60px; reduce lines to 2–3.
- File is too large: lower quality to 70–75%, export as JPG/WebP, simplify the background.
- Batch outputs look misaligned: check long titles; set smaller font or 2-line titles in your template before running Bulk Create.
Folder & Naming System (Stay Organized)
- Folders: /Canva/Templates (masters), /Canva/Posts/2026-10 (monthly), /Canva/Exports (final JPG/WebP).
- Names: post-slug_featured_1200x628.jpg, post-slug_inline_1200x800.jpg, etc.
- CSV names: bulk-create_titles_2026-10.csv.
From Plan to Action (This Week)
- Day 1: Build the five templates and save your brand kit.
- Day 2: Create a CSV with 10 titles + optional subtitles.
- Day 3: Run Bulk Create on your Featured template (generate 10).
- Day 4: Make one Inline Explainer per new post (1200×800).
- Day 5: Export, compress, upload, and add ALT text.
- Day 6–7: Publish two posts with matching graphics. Note what slowed you down and adjust templates once.
FAQs
Do I need Canva Pro?
No. You can build templates and export on the free plan. Pro speeds up resize and brand automation.
What size for featured images?
1200×628 works well for most themes and social sharing.
How do I keep images fast?
Export JPG/WebP at 70–80% quality, aim for < 200KB when possible, and use descriptive filenames.
What about accessibility?
Use strong color contrast, readable text sizes, and descriptive ALT text that explains the image’s purpose.
Keep Your Publishing Flow Light
Pair this Canva workflow with my writing routines and Starter Kit, then publish one helpful post each week. You’ll build skill and speed without stress.
Implementing these strategies will help you speed up blog graphics with Canva and enhance your overall workflow.
Your Next Calm Step
If you’re ready to put this faster Canva workflow into practice, you don’t have to figure out the rest of your online business alone.
You can start by downloading my free Affiliate Marketing Starter Kit for Beginners. It brings together the core tools, simple checklists, and gentle next steps you need to move from “ideas” to a small, realistic plan.
If you’d like structured training, community support, and a calm place to learn at your own pace, take a look at Wealthy Affiliate. Their step-by-step lessons, website tools, and member community are especially friendly for retirees and beginners.
Pair this Canva system with a clear content plan and steady learning, and each new post will feel lighter to create—graphics, writing, and publishing all working together.