
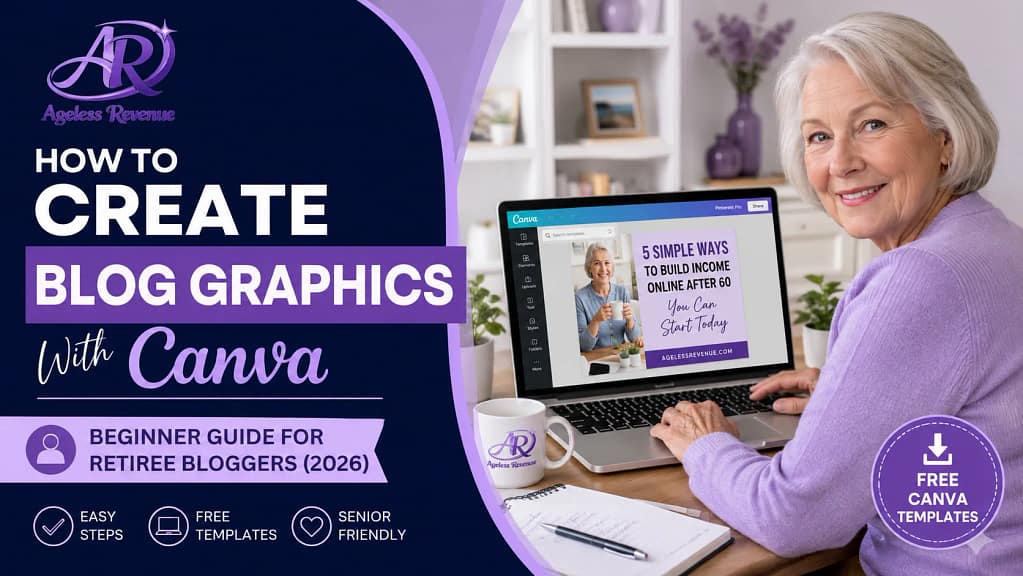
How to Create Blog Graphics With Canva: A Beginner’s Guide for Retiree Bloggers (2026)
Last Updated on 3 days ago by Gila
Every blog post you publish needs at least two images: a featured image that appears at the top of the post and in search previews, and at least one Pinterest pin to drive social traffic. For most retirees, creating these images from scratch sounds like a job for a graphic designer.
In this blog post, we will explore how to create blog graphics with Canva, making the process simple and accessible for everyone, especially retirees.
With the right guidance, you will learn how to create blog graphics with Canva without any hassle, allowing you to enhance your blog’s visual appeal.
Canva removes that barrier entirely. It is free, it runs in your browser, and it requires no design experience. Within your first session, you can create professional-looking images for your blog and Pinterest that are indistinguishable from those produced by experienced designers.
Follow our step-by-step instructions on how to create blog graphics with Canva and elevate your blogging experience.
This guide walks you through exactly how to do that — from creating your free account to producing your first blog image and Pinterest pin in under 30 minutes.
Whether you are a beginner or have some experience, this guide will show you how to create blog graphics with Canva efficiently.
In this post, you will learn how to create blog graphics with Canva easily and efficiently.
Affiliate disclosure: This post contains affiliate links. If you buy through them, I may earn a small commission at no extra cost to you.
TL;DR
- Canva is free and runs in your browser — no software to install, no design experience needed.
- Create a free account at canva.com and start with templates — they handle all design decisions.
- Blog featured images: use 1920×1080px (16:9 ratio) templates
- Pinterest pins: use 1000×1500px (2:3 ratio) templates — Pinterest displays tall images more prominently
- Create 2–3 Pinterest pin variations per blog post with different images and slightly different titles
- Brand kit: set your colours and font once, use them on every image for a consistent look
Why Every Blog Post Needs Images
Before getting into how to create images, it is worth understanding why they matter for an affiliate blog.
Understanding how to create blog graphics with Canva is crucial for making your posts stand out in a crowded digital space.
Featured images appear at the top of every blog post and are what show in social media previews when your post is shared. A professional-looking featured image signals to readers that the content inside is worth reading. A poor or missing featured image makes even excellent content look unpolished.
Let’s dive into the details on how to create blog graphics with Canva, ensuring your content captures attention.
Utilizing Canva, you will quickly learn how to create blog graphics with Canva that resonate with your audience.
Now, let’s explore how to create blog graphics with Canva that are not only eye-catching but also effective.
By following our tips on how to create blog graphics with Canva, you’ll save time while producing high-quality images.
Let’s go through the process of how to create blog graphics with Canva, ensuring a seamless experience.
Pinterest pins are how a large proportion of affiliate blog traffic arrives from social media. Pinterest is a visual search engine — users search for specific topics, and Pinterest surfaces pins that match. Every post you publish should have 2–3 pins created and scheduled, because each pin is another opportunity for your content to surface in search results.
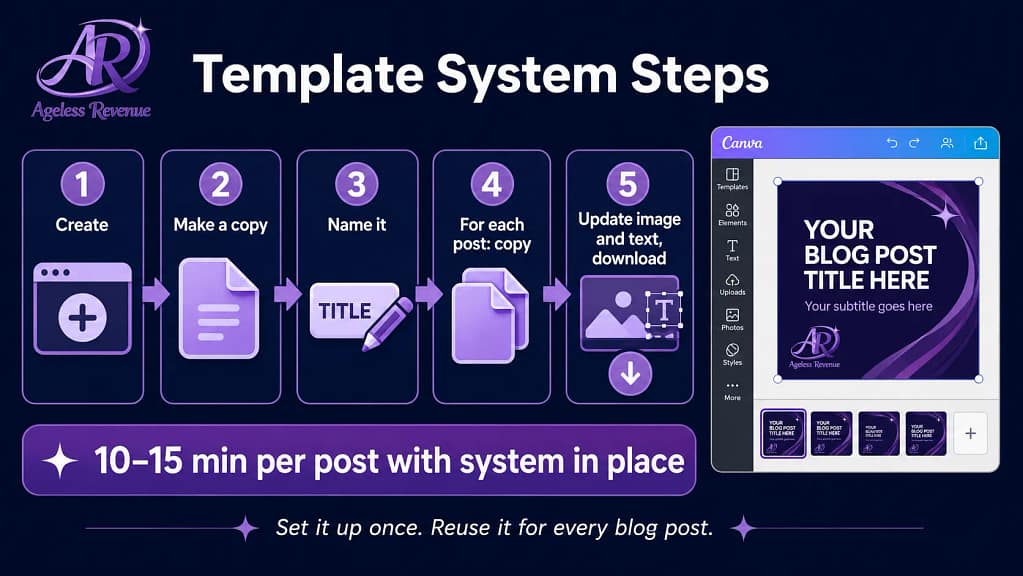
The good news: once you have a Canva template set up for each image type, creating new images takes 10–15 minutes per post.
Setting Up Your Free Canva Account
Follow this guide on how to create blog graphics with Canva and make your posts more engaging.
How to Create Blog Graphics with Canva
Ready to learn how to create blog graphics with Canva? It’s easier than you think!
Go to canva.com and click Sign Up. You can sign up with your Google account or create a new account with your email address.
Every step you take on how to create blog graphics with Canva will enhance your blogging skills.
Master the art of how to create blog graphics with Canva, and watch your blog thrive.
One of the simplest ways to improve your blog is to learn how to create blog graphics with Canva effectively.
Choose the free plan — Canva Free is sufficient for everything a retiree blogger needs. The paid Canva Pro plan ($15/month) adds AI image generation and more design flexibility, but it is not necessary to start.
Once inside, you will see Canva’s home screen with template categories. The search bar at the top is how you find the templates you need. Start by searching “blog banner” for your featured image template, and “Pinterest pin” for your pin template.
Creating Your First Blog Featured Image
Step 1 — Find your template
Now that you know how to create blog graphics with Canva, let’s explore some design tips.
With this knowledge, you can start to understand how to create blog graphics with Canva and build your brand.
In the Canva search bar, type “blog banner” or “blog featured image.” You will see hundreds of templates. Browse until you find one that matches the feel you want for your blog — clean and professional, warm and personal, or bold and informative. Click on any template to open it.
Step 2 — Change the dimensions if needed.
Blog featured images work best at 1920×1080px (16:9 ratio). Most blog banner templates are already this size. If you want to check or adjust, click Resize in the top menu bar (or start a Custom Size design with 1920×1080 dimensions).
Step 3 — Replace the background image
Click on the existing background image in the template. A toolbar appears at the top. Click Replace, then choose from Canva’s free photo library by typing a keyword related to your post topic (e.g., “garden seniors” or “laptop home office”). Click a photo to apply it.
Step 4 — Update the text overlay
Click on any text element in the template to select it. Type your blog post title. Adjust the font size if needed — the title should be large enough to read clearly even as a thumbnail. Delete any text elements you do not need.
Step 5 — Apply your brand colours
Click on any design element and look for the colour dot in the toolbar. Change it to your brand colour. For Ageless Revenue, this is purple (#5B2D8E) and dark navy (#1A0A2E). Applying your brand colour consistently across all images makes your blog look professional and recognisable.
Step 6 — Download
Click the Download button in the top right. Choose WebP or PNG format. WebP files are smaller and load faster — use these for blog images. Save the downloaded file with a descriptive, keyword-rich filename before uploading to WordPress (e.g., best-garden-trowels-seniors-arthritis.webp).
Creating Your Pinterest Pins
Pinterest pins should be tall — the platform displays 2:3 ratio images (1000×1500px) more prominently in search results than square or landscape images. This is one of the most important things to get right.
Step 1 — Find your Pinterest template
In the Canva search bar, type “Pinterest pin.” Canva has hundreds of templates already sized correctly at 1000×1500px. Choose one that suits your blog style — bold text on a simple background works well for most niches.
Step 2 — Set up your pin template.
Replace the background image with a relevant photo from Canva’s free library. Update the title text with your post title — make it specific and keyword-rich. Add your blog name or URL in small text at the bottom. Apply your brand colour to the text overlay or banner element.
Step 3 — Create 2–3 variations
Rather than creating one pin per post, create two or three variations. Duplicate the template (click the page thumbnail, then Duplicate Page), change the background image, and adjust the title slightly. Variation 1 might say “How to Start Raised Bed Gardening With Limited Mobility.” Variation 2 might say “Raised Bed Gardening for Seniors — The Complete Beginner Guide.”
Different variations surface for different search queries on Pinterest, giving your content more opportunities to be discovered.
Step 4 — Download all variations
Use our guide on how to create blog graphics with Canva to produce stunning visuals.
Click Download and choose to download all pages. You will get all three pin variations in one download. Name each file descriptively before uploading (e.g., raised-bed-gardening-seniors-pin-1.webp).
Setting Up a Brand Kit (Do This Once, Use Forever)
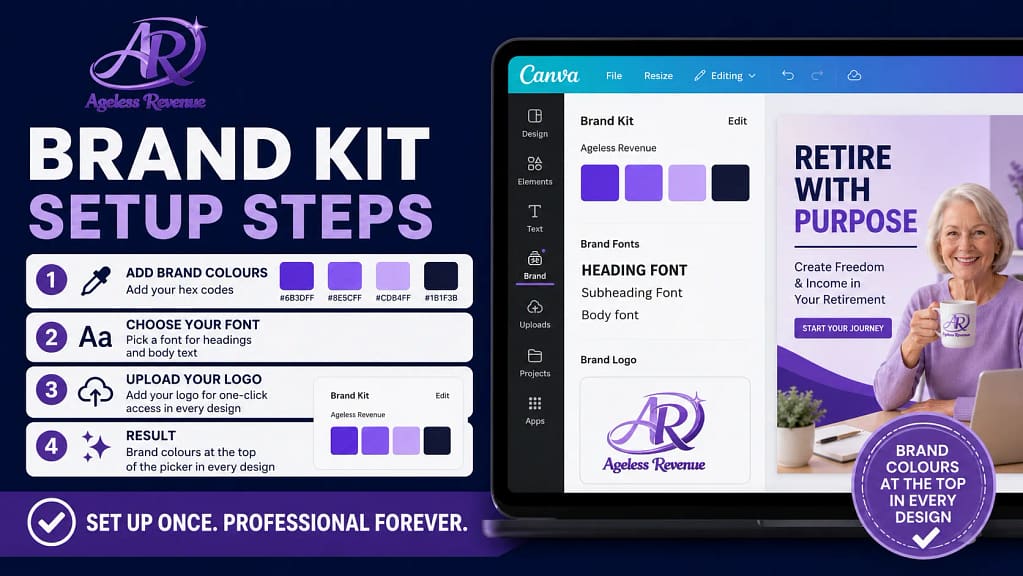
A brand kit is a saved set of your colours, fonts, and logo that you can apply to any Canva design instantly. Setting this up once means every image you create has a consistent look without having to remember your exact colour codes each time.
In conclusion, knowing how to create blog graphics with Canva can significantly benefit your online presence.
Now that you’ve learned how to create blog graphics with Canva, it’s time to put that knowledge to work!
In Canva, go to the Brand Kit section (in the left sidebar or through your account settings). Add your brand colours by clicking the + button and entering your hex colour codes. Add your preferred font. Upload your blog logo if you have one.
Once saved, your brand colours and fonts appear at the top of the colour and font selector every time you design — one click to apply consistently.
Make sure to review your new skills on how to create blog graphics with Canva regularly to stay updated.
Saving and Reusing Templates
The biggest time-saver in Canva is the template you set up once and reuse for every new post.
By mastering how to create blog graphics with Canva, you will undoubtedly enhance your blogging strategy.
After creating your blog featured image and Pinterest pin designs, save them as templates. In Canva, go to your design and click the three dots menu → Make a copy. Name the copy “[Template] Blog Featured Image” or “[Template] Pinterest Pin.” Keep these templates untouched.
When you need a new image for a new post, open the relevant template, make a copy of it, then edit the copy — change the background image and update the text overlay. Your branding remains consistent, and the process takes 10 minutes rather than starting from scratch each time.
Adding Alt Text When You Upload to WordPress
When you upload an image to WordPress, fill in the Alt Text field before inserting it into your post. Alt text is a short description of the image that serves two purposes: it helps visually impaired readers who use screen readers, and it gives Google additional context about the image and the post.
Good alt text for an affiliate blog image: “best lightweight garden trowels for seniors with arthritis — product comparison guide”
Poor alt text: “image1” or leaving it blank.
Include your post’s target keyword in the alt text naturally. This is a small SEO signal that adds up across many images over time.
Frequently Asked Questions
Does Canva work on an iPad or tablet?
Yes. Canva has a dedicated iPad app that works well. The free version on iPad includes all the same templates as the browser version. If you find a keyboard and mouse more comfortable, the browser version at canva.com works on any device with a modern web browser.
Do I need the paid Canva Pro plan?
No. Canva Free includes thousands of templates, a large free photo library, and all the tools needed to create professional blog images and Pinterest pins. The main Pro features you might eventually want are AI image generation (creates custom photos from a text description) and access to premium templates. These are nice-to-haves, not necessities.
What image format should I use for blog images?
WebP is the best format for blog images — smaller file size than PNG or JPG, which means faster page loading. If WebP is not available in your version of Canva, PNG is a good alternative. Compress images before uploading using a free tool like TinyPNG.
How long does it take to create images once I have templates set up?
With templates saved and your workflow established, creating one blog featured image and two Pinterest pin variations takes 10–15 minutes. The first time takes longer because you are setting up templates and learning the interface, but most retiree bloggers feel comfortable within two or three sessions.
Your Next Step
Go to canva.com and create your free account now. Search “Pinterest pin” in the template library and open the first one that catches your eye. Spend 15 minutes experimenting — change the text, swap the background image, apply a colour. You do not need to use anything you create in this session. The goal is to get familiar with how Canva works before you need to create something for a real post.
For a complete guide to using Pinterest to drive traffic to your blog posts, read Pinterest for Affiliate Marketing Beginners.
For a structured path to building your affiliate blog with training and tools included, try Wealthy Affiliate free →
This post contains affiliate links. If you buy through them, I may earn a small commission at no extra cost to you. Start learning how to create blog graphics with Canva today!


