
Email Deliverability for Retiree Bloggers: How to Make Sure Your Emails Actually Arrive (2026)
You spent 45 minutes writing a helpful email to your list. You pressed send. And a significant portion of your subscribers never saw it — because it landed in their spam folder. Understanding email deliverability for retiree bloggers is essential for reaching your audience.
For those new to blogging, mastering email deliverability for retiree bloggers is crucial for ensuring your messages are seen.
This is more common than most bloggers realise. Email deliverability — the technical term for whether your emails actually reach the inbox — is one of the most underestimated issues for new bloggers. The good news is that the most important fixes are straightforward, one-time setup tasks that you do once and then largely forget.
This guide covers exactly what you need to do to protect your deliverability for email deliverability for retiree bloggers, in plain language, with no technical background required.
Affiliate disclosure: This post contains affiliate links. If you buy through them, I may earn a small commission at no extra cost to you.
TL;DR
- Most deliverability problems come from four fixable causes: authentication records, sending behaviour, list quality, and email content.
- SPF, DKIM, and DMARC are three technical records you set once in your domain settings — your email platform (MailerLite) provides the exact values to paste in
- Never buy email lists — they destroy deliverability and violate most platform terms.s
- Remove inactive subscribers every 3–6 months to maintain a healthy open rate.
- Use your real name in the From field, avoid spam trigger words, and always include an unsubscribe link.
Why Deliverability Matters for Affiliate Bloggers
Every email you send that lands in spam is affiliate revenue you do not earn. If 30% of your emails go to spam folders, 30% of your affiliate recommendations are never seen. Over time, poor deliverability compounds — inbox providers track your reputation and increasingly filter your emails based on your historical performance.
The reverse is also true. Strong deliverability compounds positively. Emails that consistently reach the inbox get opened. Emails that get opened signal to inbox providers that your content is wanted. That positive reputation makes future emails even more likely to land in the inbox.
Deliverability is not glamorous, but for an email-based affiliate business, it directly connects to income.
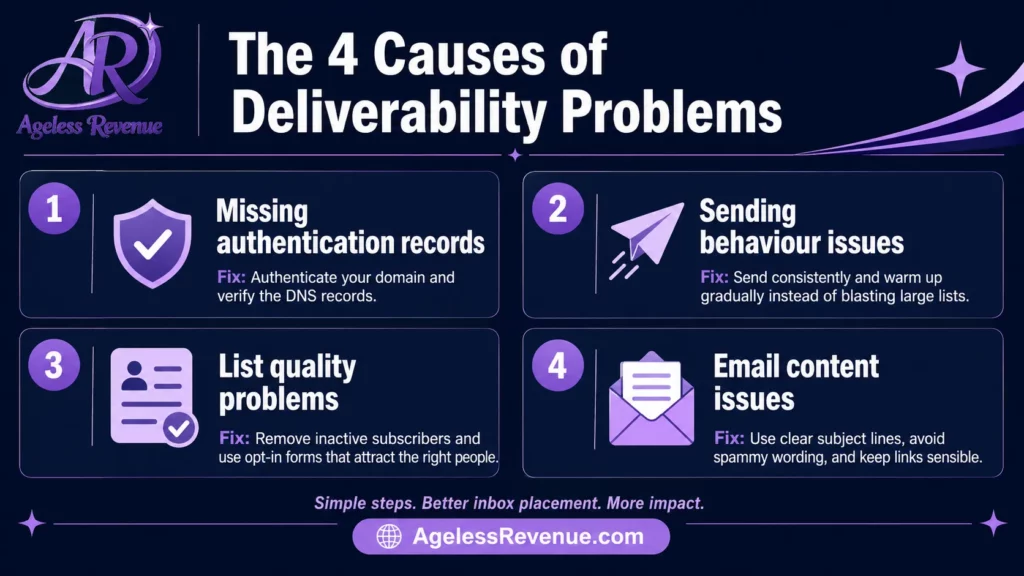
The Four Causes of Deliverability Problems
Email Deliverability for Retiree Bloggers:Essential Tips
Cause 1: Missing Authentication Records
Email authentication records are technical settings that prove to inbox providers that your emails are genuinely coming from your domain — not from a spammer pretending to be you. Three records matter:
SPF (Sender Policy Framework): tells inbox providers which servers are authorised to send email on behalf of your domain. Without it, emails from your domain are treated with suspicion.
DKIM (DomainKeys Identified Mail): adds a digital signature to every email you send that inbox providers can verify. It proves the email has not been tampered with in transit.
DMARC (Domain-based Message Authentication, Reporting and Conformance): tells inbox providers what to do with emails that fail SPF or DKIM checks — reject them, quarantine them, or deliver them with a warning.
How to set these up with MailerLite:
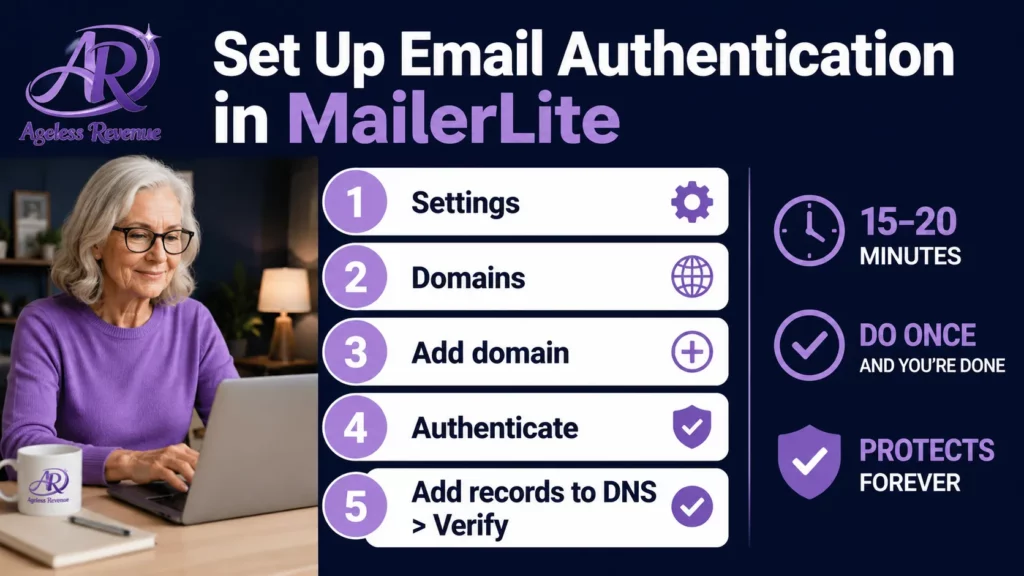
- In MailerLite, go to Settings → Domains
- Add your domain and click Authenticate
- MailerLite generates the exact SPF, DKIM, and DMARC records you need to add.
- Log in to your domain registrar (the company where you bought your domain — Namecheap, GoDaddy, etc.)
- Go to DNS settings and add the records exactly as MailerLite shows them
- Return to MailerLite and click Verify — the process completes automatically
This takes 15–20 minutes and is the single most impactful thing you can do for deliverability. Do it before sending your first campaign.
Cause 2: Sending Behaviour Problems
How you send emails affects deliverability as much as what you send.
Sudden volume spikes. Inbox providers notice when a sender who usually sends 200 emails suddenly sends 2,000. This pattern is associated with spam campaigns. If your list grows significantly, increase your sending volume gradually rather than all at once.
Sending too infrequently. If you only email your list every few months, subscribers forget who you are. They mark your email as spam — not out of malice, but because they genuinely do not recognise the sender. Consistent weekly or fortnightly sending maintains recognition.
Using a free email address as your From address. Sending affiliate marketing emails from a Gmail or Yahoo address rather than your domain email (gila@agelessrevenue.com) reduces deliverability. Set up a custom domain email through your hosting provider — most hosts include this for free.
Cause 3: List Quality Problems
A list full of invalid, inactive, or disengaged subscribers hurts your deliverability in two ways. First, sending to invalid addresses generates hard bounces, which damage your sender’s reputation. Second, sending to disengaged subscribers who never open your emails sends negative signals to inbox providers.
Never buy email lists. Purchased lists are the fastest way to destroy email deliverability permanently. The addresses are typically invalid, harvested without consent, or already associated with spam complaints. Most email platforms, including MailerLite, prohibit imported lists of this type.
Remove hard bounces immediately. A hard bounce means the email address does not exist or is permanently unreachable. MailerLite handles this automatically — bounced addresses are removed from your active list.
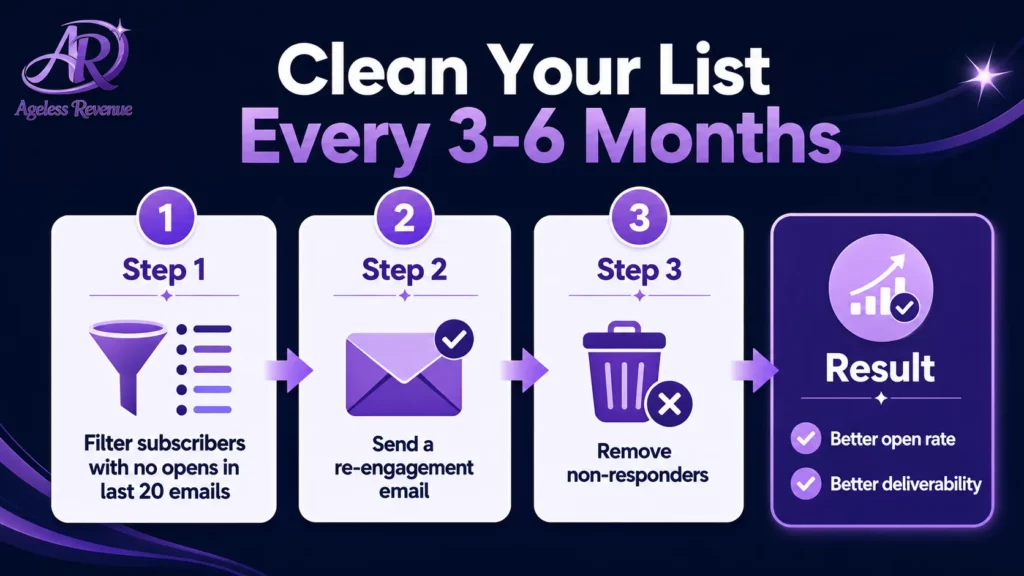
Remove chronically inactive subscribers every 3–6 months. In MailerLite, filter your list for subscribers who have not opened any of your last 20 emails. Send them a re-engagement email: “I noticed you haven’t opened any of my recent emails — are you still interested in hearing from me? Click here to stay subscribed.” Those who do not re-engage can be removed. A smaller, engaged list always outperforms a larger, disengaged one.
Cause 4: Email Content Problems
The content of your emails affects whether they reach the inbox.
Spam trigger words. Certain words and phrases are associated with spam and cause inbox providers to filter emails before they reach the reader. Common triggers include: FREE (especially in all caps), MAKE MONEY, GUARANTEED, CLICK HERE, LIMITED TIME, ACT NOW. You can use these concepts, but write around the trigger phrases rather than using them directly.
Excessive links. An email with 15 affiliate links looks like a promotional broadcast to spam filters. Most of your emails should have one primary link — either to a blog post or to an affiliate product with a disclosure. Two or three links maximum.
Image-heavy emails. Emails that consist primarily of images with minimal text are often associated with spam. MailerLite’s simple templates balance text and images well — avoid building emails that are essentially one large image.
Missing unsubscribe link. Every marketing email must contain an unsubscribe link — this is a legal requirement under CAN-SPAM, GDPR, and similar regulations. MailerLite adds this automatically to every email. Never remove it or attempt to hide it.
Testing Your Deliverability
Before sending to your full list, test your emails.
Mail-Tester (mail-tester.com): a free tool that gives you a spam score from 1–10 for a test email. Send your email to the test address it provides, then check your score. A score of 9 or above is excellent. Below 7 indicates problems to address.
MailerLite’s inbox preview: shows how your email renders in major email clients before you send. Check it for every campaign.
Send to yourself first: always send a test email to your own inbox before broadcasting to your list. Check that the formatting looks correct, links work, images load, and the email displays properly on your phone as well as your desktop.
Your Monthly Deliverability Check (10 Minutes)
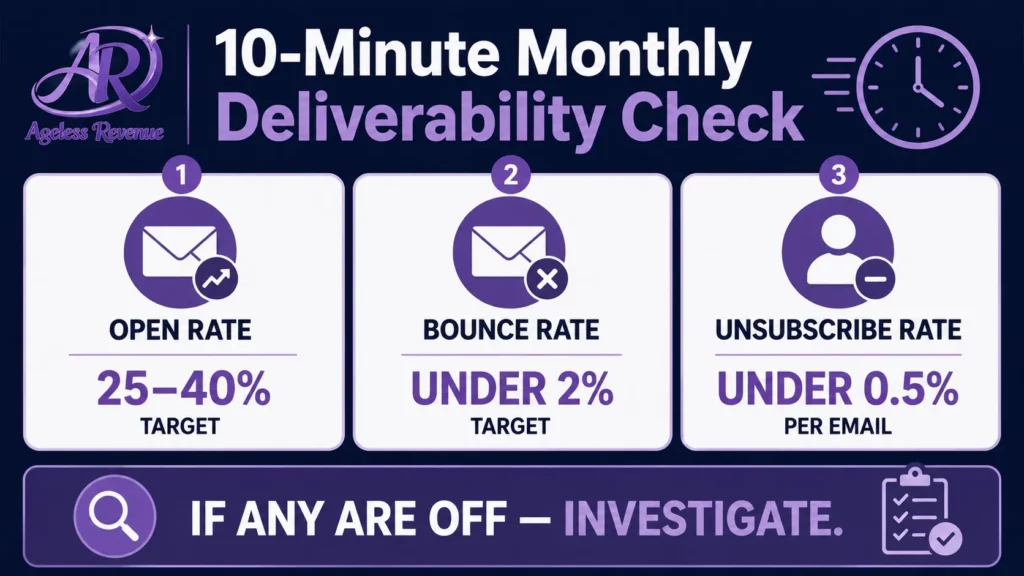
Once your authentication records are set up, deliverability maintenance is simple and quick.
Check your open rate. In MailerLite’s campaign reports, look at your average open rate. For a retiree niche blog with a warm, engaged list, 25–40% is healthy. Below 20% consistently suggests either a deliverability problem or a subject line problem.
Check your bounce rate. Hard bounces above 2% indicate list quality issues. MailerLite manages hard bounces automatically, but a sudden spike warrants investigation.
Check your unsubscribe rate. An unsubscribe rate above 0.5% per email suggests the content is not meeting subscriber expectations. Review your recent emails and ask whether you are delivering what subscribers signed up for.
Frequently Asked Questions
Do I need to understand the technical details of SPF, DKIM, and DMARC to set them up?
No. You only need to follow the steps in MailerLite’s domain authentication wizard. It generates the exact records you need to add to your domain DNS settings. The process involves copying and pasting values — no technical knowledge required.
My emails are going to spam. What should I check first?
Check authentication first — verify that SPF, DKIM, and DMARC are correctly set up in your MailerLite settings. This resolves the majority of spam folder issues for new senders. If authentication is set up correctly, check your list quality and email content for spam trigger words.
How often should I clean my email list?
Every 3–6 months for most retiree bloggers. Filter for subscribers who have not opened any of your last 15–20 emails and send a re-engagement campaign. Remove those who do not respond. This keeps your open rates healthy and your sender reputation strong.
Will removing inactive subscribers hurt my deliverability?
The opposite. Removing inactive subscribers improves your open rate (a smaller percentage of your list, but more accurate), reduces your hard bounce rate, and sends more positive engagement signals to inbox providers. A clean, engaged list of 300 subscribers delivers better results than a bloated list of 1,000 with 700 inactive addresses.
Your Next Step
If you have not yet set up email authentication for your domain, do it today. Log in to MailerLite, go to Settings → Domains, add your domain, and follow the authentication wizard. It takes 15–20 minutes and provides permanent protection for your sender’s reputation.
For a complete guide to building your email list from scratch, read Email Marketing for Retiree Bloggers.
For a structured path with training, tools, and community support, try Wealthy Affiliate free →
This post contains affiliate links. If you buy through them, I may earn a small commission at no extra cost to you.