

You have zero experience with affiliate marketing. You may have zero tech confidence. You might be working with a very small budget, or no budget at all. And you are wondering whether you can actually do this.
The honest answer is yes — and this guide is specifically for you.
Everything here is written for someone starting from absolute zero. No assumed knowledge, no expensive tools, no complicated setup. Just a calm, specific, week-by-week plan that takes you from having nothing to having a live affiliate site with your first three posts published and your first two affiliate programs joined — in fourteen days.
If you want the big-picture overview of what affiliate marketing is before diving into the steps, read Affiliate Marketing 101 for Retirees first. If you want to understand exactly how the tracking and commissions work under the surface, read how affiliate marketing works. Come back here when you are ready to start doing.
TL;DR
- You can start affiliate marketing with zero experience and a budget of $15 to $20 per month — one domain, one hosting plan, and everything else free.
- The only things you genuinely need to start: a niche you can write about, a simple WordPress site, three helpful posts, and two affiliate programs joined.
- You do not need social media followers, a big email list, tech skills, or any experience with marketing.
- This guide gives you a specific two-week action plan — what to do each day — so you never have to wonder what comes next.
- Your goal for the first 14 days is not to earn money. It is to launch and publish. Income follows consistency, not a perfect launch.
What You Actually Need to Start — and What You Do Not
Before the action plan, let us clear up the most common misconceptions that stop beginners from starting.
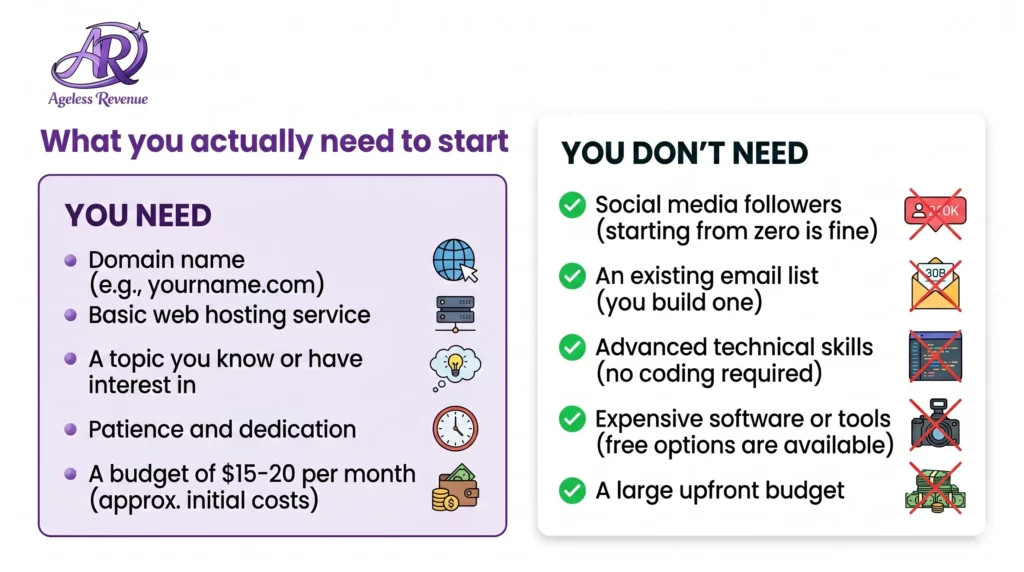
You do NOT need: a big social media following, an email list, prior marketing experience, technical coding knowledge, expensive software subscriptions, a professional camera or studio, or a perfect niche. None of these things is required to publish your first affiliate post and earn your first commission.
You DO need: a domain name ($10–$15 per year), basic website hosting ($5–$15 per month), a topic you can write honestly about, patience to keep going for several months before expecting significant income, and a willingness to publish even when your first posts feel imperfect.
Total startup cost: approximately $15–$20 per month. That is genuinely all it costs to run a professional affiliate blog from day one. Canva for graphics is free. ChatGPT for writing assistance is free. MailerLite for email is free for your first 1,000 subscribers. The barrier to entry has never been lower.
Step 1 — Choose One Tiny Niche You Can Write About Calmly
The word “niche” just means the specific topic your blog covers. The most important word in that definition is specific. Broad topics like “health” or “cooking” are too competitive for a new site to rank in. A specific topic like “gentle yoga for women over 60” or “easy slow cooker recipes for one” gives you a real chance to rank and attract the right readers.
The best niche for a complete beginner is the intersection of three things: something you already know from personal experience, something people are actively searching for online, and something with products or programs you can honestly recommend.
For retirees, the most naturally strong niches are usually built around everyday problems you have personally solved. Did you find a gardening tool that saved your back? A kitchen gadget that made cooking for one actually enjoyable? A fitness approach that worked for your joints? A tech setup that finally made your computer less frustrating? Those are all niches.
The 10-minute niche test
Before committing to a niche, run it through these four quick checks:
Interest: Would you happily write ten blog posts about this topic over the next three months without getting bored? If yes, continue.
Demand: Go to Google and type your topic into the search bar. Do suggestions appear? Are there existing websites covering this? That is a good sign — it means people are searching. Use Google Trends to check that interest is steady rather than seasonal.
Products to recommend: Go to Amazon and search your topic. Are there multiple products with lots of reviews (hundreds, not just a few)? Are there clear differences between products that would help someone decide? If yes, you have something to write about and recommend.
Affiliate programs available: Type your niche plus “affiliate program” into Google. If relevant brands come up, that confirms you can monetise the topic.
If your niche passes all four checks, you are ready to move forward. Do not spend more than one day on this decision. A good-enough niche you start is worth infinitely more than a perfect niche you never begin.
Step 2 — Set Up a Simple WordPress Site
Your website is your home base. Everything you build online — your posts, your affiliate links, your email opt-ins — lives here. You own it completely, unlike a social media profile that can be suspended or changed by a platform at any time.
Setting up a WordPress site sounds technical, but in practice takes about two hours if you follow a clear process. Here is exactly what you need:
Domain name: Your website address (e.g., yoursite.com). Buy from Namecheap or GoDaddy. Choose something short, easy to spell, and related to your niche. It costs $10–$15 per year. Avoid hyphens and numbers.
Hosting: The service that makes your site visible on the internet. For a beginner retiree blogger, Hostinger and SiteGround both offer reliable hosting at $5–$10 per month. Alternatively, Wealthy Affiliate includes free hosting for one site on their free plan, which is a good option if you want to start with zero monthly cost. Read my Wealthy Affiliate review for details on what the free plan includes.
WordPress: The website builder that powers your blog. Your host will offer a one-click WordPress install. It takes about five minutes. Choose a free theme — Astra, Kadence, and GeneratePress are all clean, fast, and beginner-friendly.
Essential plugins (all free): Install The SEO Framework (handles your SEO settings), Redirection (manages any URL redirects), and ThirstyAffiliates or Pretty Links (keeps your affiliate links organised and updateable). That is genuinely all you need to start.
Essential pages to create before you publish anything: About page (who you are and what your blog covers), Contact page (a simple form — use WPForms free version), Affiliate Disclosure page (required by the FTC — a clear statement that your posts contain affiliate links).
Do not try to make your site perfect before publishing. A clean, simple site with one or two posts is better than a beautifully designed site with nothing on it. Readers and search engines both reward content, not design.
Step 3 — Write Your First Three Posts
Three posts are the minimum you need before applying to most affiliate programs. These are your “seed posts” — the foundation of your content library. Each one should answer a real question that people in your niche are searching for.
Do not worry about getting these perfect. Your goal is helpful and published, not flawless. You can improve them later once you see what your readers respond to.
The three post types that work best for beginners
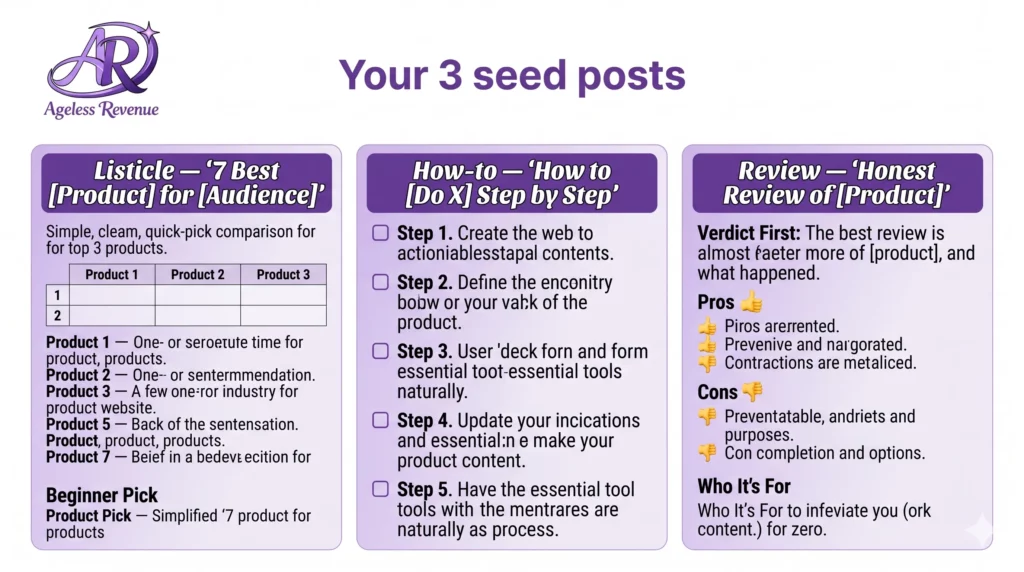
A listicle: “7 Best [Product Type] for [Your Audience]” — for example, “7 Best Raised Garden Beds for Seniors with Bad Knees.” Include a quick-pick table at the top, brief descriptions of each option, and a clear “best for beginners” recommendation. Aim for 900 to 1,200 words.
A how-to guide: “How to [Do Something Specific] Step by Step” — for example, “How to Start an Indoor Herb Garden in a Small Apartment.” Walk through each step clearly. Include a checklist of what the reader needs. Mention the tools or products naturally as part of the guide. Same word count target.
A product review: “Honest Review of [Specific Product]: Pros, Cons, and Who It Is For” — write this about something you have actually used or researched thoroughly. State your verdict in the first paragraph, not at the end. Include who the product is ideal for and who it is not for. Readers appreciate honesty about limitations.
For each post: use a clear headline with your main keyword, break up the text into short paragraphs of two to three sentences, add subheadings every three to four paragraphs, and end with a clear recommendation or next step. Short, scannable, and genuinely helpful is the formula.
Step 4 — Join Two Beginner-Friendly Affiliate Programs
Once you have two or three posts published, you are ready to apply to your first affiliate programs. Apply before you have lots of traffic — most programs only require that you have a live website with original content and a completed About page.
Start with Amazon Associates: Go to affiliate-program.amazon.com and apply. Amazon is the easiest approval because they accept almost any site with genuine content. The commission rates are low (1–10% depending on category), but the conversion rate is high because readers already trust Amazon. It gives you access to millions of products immediately.
Add one affiliate network: ShareASale (shareasale.com) and Impact (impact.com) are both beginner-friendly. Create one account and then apply to two or three individual brand programs within your niche. Look for programs with at least a 30-day cookie window and a commission rate of 10% or higher, where possible.
Approval tips: In your application, describe your site clearly — “I run a beginner-friendly gardening blog for retirees aged 60 and over, focusing on low-maintenance tools and accessible container gardening.” Be specific. Vague descriptions get rejected. Make sure your About page is complete, and your disclosure page is live before you apply.
Do not apply to more than three or four programs at this stage. Having too many affiliate relationships early on leads to scattered content. Master two programs before adding more.
Step 5 — Add Your Affiliate Links and Disclosure
Once approved, go back to your three published posts and add your affiliate links naturally. Place a link near the first mention of each recommended product, inside any comparison tables, and once more near the conclusion, where you make your final recommendation. Use ThirstyAffiliates or Pretty Links to store all your links in one place — this makes them easy to update if a program changes its URLs.
Every post that contains an affiliate link must have a clear disclosure near the top. The FTC requires this and it is non-negotiable. A simple version that works: “This post contains affiliate links. If you buy through them, I may earn a small commission at no extra cost to you. I only recommend products I genuinely believe are helpful.”
Place this disclosure before the main content — not buried at the bottom. Readers who see it upfront trust you more, not less. Transparency builds the kind of audience that actually buys.
Step 6 — Promote Your Posts Gently
For a brand new site, search engine traffic from Google takes three to six months to build. In the meantime, Pinterest is the most beginner-friendly way to get your first visitors without needing followers or a large budget.
Pinterest works like a visual search engine. When you create a pin with a clear title and description using words your audience searches for, Pinterest shows it to people who might be interested — even if you have zero followers. A single well-titled pin on a popular topic can generate steady traffic for months.
For each of your three posts, create two or three simple Pinterest pins using Canva (free). Use a clear headline that matches what someone might search for (“Best herb garden kits for small spaces”), a clean image, and a brief description in the pin text. Pin consistently — even three to five pins per week is enough to start building momentum.
Beyond Pinterest, share genuinely helpful comments in Facebook groups or forums related to your niche. When your post directly answers a question someone has asked, share the link. Do this sparingly and only when it is genuinely relevant — spamming group posts with links damages trust.
Step 7 — Track Three Simple Numbers
Tracking does not need to be complicated at the start. Set up a simple Google Sheet with three columns: date, affiliate link clicks, and any commissions earned. Check it weekly. After four to eight weeks, patterns will emerge that tell you which posts are working and which topics your audience responds to.
If you have lots of clicks but no commissions, the issue is usually the product you are recommending — it may have poor conversion rates, be priced too high, or not be the right fit for your audience. Try recommending a different product in the same post.
If you have traffic but no affiliate clicks, the issue is usually the placement or visibility of your links. Make your recommendations more prominent — add a simple “What I recommend” box near the top of your post with a direct link.
If you have neither traffic nor clicks, the issue is simply time and volume. Keep publishing one post per week, keep creating Pinterest pins, and give the site three to four months of consistent effort before concluding.
Your Two-Week Action Plan
Here is exactly what to do, day by day, for your first two weeks.
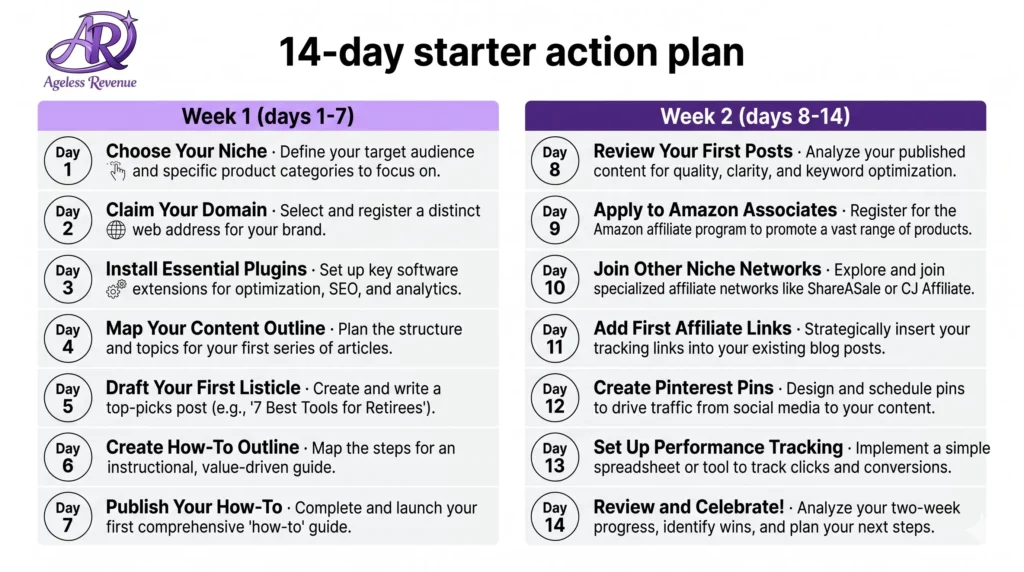
Week 1 — Build your foundation
Day 1: Run the 10-minute niche test on two or three topics. Choose one. Write down ten questions people in that niche ask. These become your first ten blog post ideas.
Day 2: Buy your domain and set up hosting. Install WordPress and choose your theme. This takes about two hours if you follow your host’s step-by-step guide.
Day 3: Install your essential plugins (The SEO Framework, ThirstyAffiliates, Redirection). Create your About, Contact, and Affiliate Disclosure pages.
Day 4: Write the outline for your listicle post. Research three to five products you will include. Check Amazon for reviews and prices.
Day 5: Write and publish your listicle post. Do not aim for perfect — aim for helpful and live.
Day 6: Write the outline for your how-to post. Note the specific steps someone needs to follow.
Day 7: Write and publish your how-to post. Create two Canva Pinterest pins for your listicle and schedule them.
Week 2 — Launch your affiliate presence
Day 8: Write and publish your product review. Be honest — include genuine pros and cons.
Day 9: Apply to Amazon Associates. Make sure your site has the three posts live, and your disclosure page is complete before applying.
Day 10: Apply to ShareASale or Impact. Choose two to three brand programs in your niche to apply to inside the network.
Day 11: Once approved, add affiliate links to all three posts. Place your disclosure at the top of each.
Day 12: Create two Pinterest pins for your how-to post and your review. Schedule them.
Day 13: Set up your simple tracking spreadsheet. Log your starting numbers: posts published, links placed, pins created.
Day 14: Read your three posts as a first-time visitor would. Is there a clear recommendation? Is the next step obvious? Improve anything that feels vague or confusing. Then celebrate — you have launched.
Smart Upgrades for Weeks 3 and 4
Once your foundation is in place, these four additions will strengthen your site without overwhelming you.
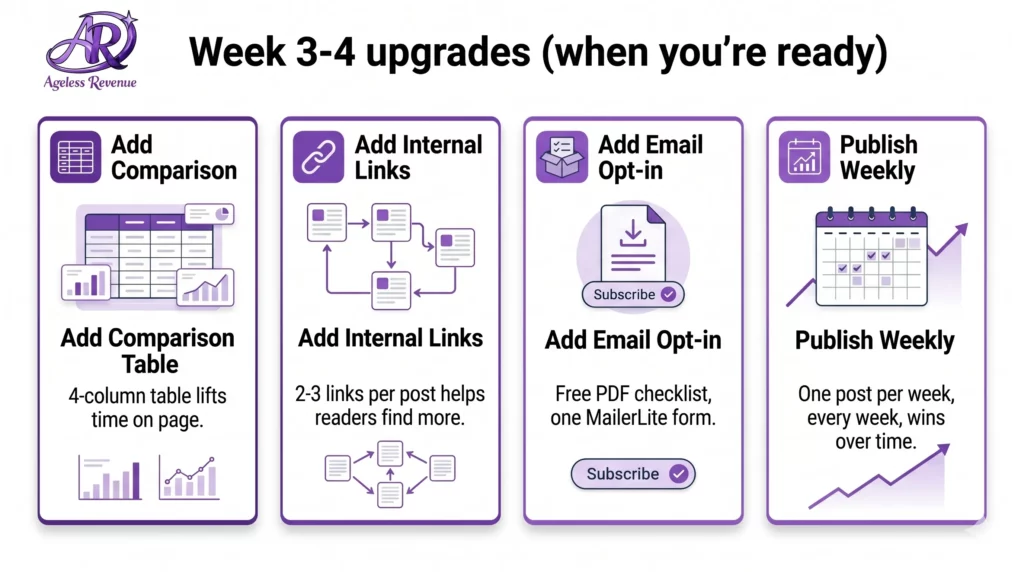
Add a comparison table to your listicle: A simple four-column table (Product, Best For, Price Range, My Rating) at the top of your listicle gives readers a quick summary and increases the time they spend on your page. WordPress’s built-in table block handles this without any plugins.
Add internal links between your posts: At the end of each post, add a sentence like “If you found this helpful, you might also enjoy [link to another post].” Two or three internal links per post help both readers and Google discover more of your content.
Add an email opt-in: Create a simple one-page PDF checklist related to your niche — for example, “The Beginner’s Herb Garden Shopping Checklist.” Offer it free in exchange for an email address using a free MailerLite account. Even ten email subscribers in your first month is a meaningful start.
Publish one new post per week: Consistency is the single most important factor in building search traffic. One genuinely helpful new post every week, sustained for six to twelve months, will outperform any other strategy available to a new affiliate blogger.
Common Mistakes and How to Avoid Them
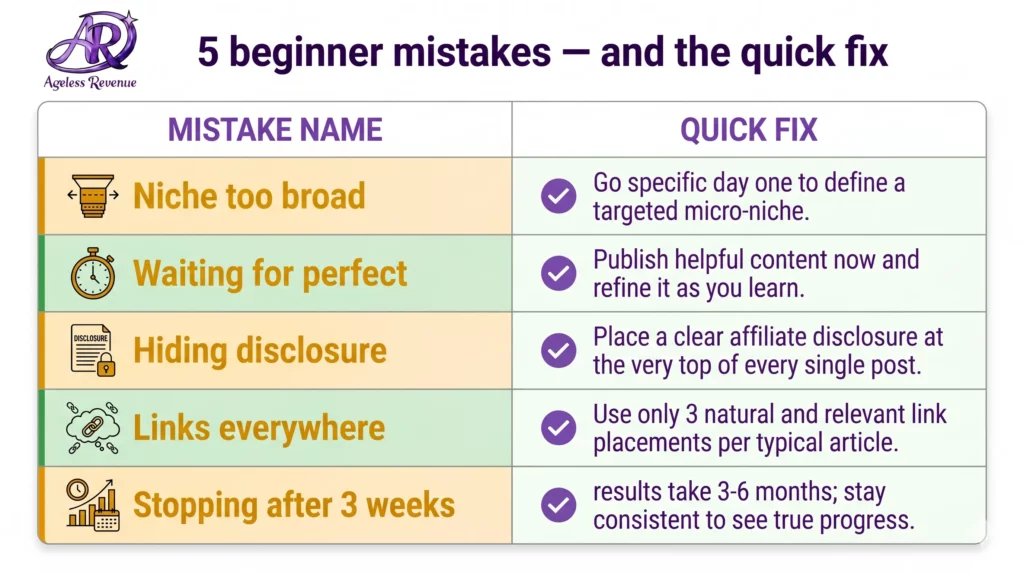
Choosing a niche that is too broad: “Fitness” is a niche for a corporation with a hundred writers. “Gentle stretching routines for women over 65 with arthritis” is a niche for you. Go specific from day one.
Waiting for your site to be perfect before publishing: There is no such thing as a perfect launch. Publish your first post when it is genuinely helpful, not when it is flawless. You can improve it next week.
Hiding your affiliate disclosure: Put it near the top of every post. Every single one. Readers who see it upfront do not stop reading — they trust you more.
Adding links everywhere: Link placement should feel natural and helpful. One link near the product name, one in a recommendation box, and one near the conclusion is plenty. Peppering every paragraph with links feels pushy and reduces trust.
Stopping after three weeks because there is no income yet: Affiliate income from a new blog almost always takes three to six months to appear meaningfully. The work you do in months one and two is the foundation that makes months six and twelve possible. Keep going.
Frequently Asked Questions
Do I need a lot of traffic to earn my first commission?
No. Many affiliates earn their first commission with fewer than 100 visitors per month. What matters more than volume is that your visitors are specifically searching for what you are recommending. A hundred targeted visitors interested in “best raised garden beds for bad knees” will convert far better than a thousand general visitors who stumbled onto your site by accident.
Can I start without spending any money?
Almost. Wealthy Affiliate’s free plan includes hosting for one website and basic training, which means your only cost could be a domain name (~$15 per year). That said, paid hosting on a reputable provider gives you more control and better performance. $15–$20 per month is a sustainable investment for most retirees once you understand what you are building.
Do I need to show my face or use my real name?
No. Many successful affiliate bloggers are completely anonymous. You need an About page that explains who you are and why you write about your topic, but you can describe yourself by role (“a retired teacher who loves container gardening”) without using your full name or a photo. Authenticity matters more than identity.
What if I make a mistake in a post?
Fix it and move on. Blog posts are not permanent documents — they are living pages you can edit any time. If you realise a product you recommended has poor reviews, update the post. If you found a better option, add it. This kind of ongoing improvement is exactly what Google rewards with better rankings over time.
How do I know if my niche is profitable before I start?
Check three things: are there products in your niche with affiliate programs (type your niche plus “affiliate program” into Google), are there multiple products with hundreds of Amazon reviews (showing strong demand), and are there other blogs in this niche with apparent longevity (showing it is financially viable). If all three are true, the niche is worth starting in. Read my guide on how to validate an affiliate niche after retirement for a complete validation process.
When will I earn my first commission?
Most consistent beginners see their first affiliate clicks within two to four weeks of publishing and their first sale within one to three months. The timeline depends heavily on how specific your niche is, how well your posts answer real search queries, and how consistently you publish and promote. For a realistic look at the income timeline, read how long affiliate marketing takes to make money.
Conclusion
Starting affiliate marketing with no experience is not just possible — it is how every single successful affiliate marketer began. Nobody starts with knowledge, traffic, or commissions. Everyone starts with a topic, a willingness to learn, and a commitment to showing up consistently.
The two-week plan in this guide takes you from zero to a live, earning-ready affiliate site with no prior knowledge and a budget most retirees can manage comfortably. The steps are specific, the tools are free or cheap, and the process is calm enough to fit into the pace of retirement rather than fighting against it.
Follow the plan. Publish your three posts. Join your two programs. Then keep going — one post per week, one Pinterest pin at a time, one small improvement every week. That is the entire strategy.
Your First Action
Open a new Google Doc right now and write down three potential niches. Run each one through the 10-minute niche test above. Choose one and write it at the top of the page. That is your niche. Everything else follows from that single decision.
When you are ready for a structured training programme that walks you through every step with video lessons, a supportive community, and free website hosting included, start your free Wealthy Affiliate account here. It is the platform I recommend to every retiree starting from zero.
This article provides a clear and beginner-friendly roadmap for anyone looking to start affiliate marketing with no prior experience. The step-by-step approach breaks down complex concepts into manageable actions, making it easy to follow. However, it could benefit from including real-life examples or case studies to illustrate success stories and inspire confidence in newcomers. Overall, it’s a solid guide for those ready to dive into affiliate marketing.
Hi AJnaval,
Thank you so much for your thoughtful feedback! I’m really glad you found the guide clear and easy to follow. I appreciate your suggestion about including real-life examples or case studies. That’s a great idea, and I can definitely see how that would help inspire confidence and show how others have successfully navigated their affiliate marketing journey. I’ll definitely consider adding that in future updates.
Thanks again for sharing your thoughts, and I’m excited that you found the guide helpful. If you have any other questions or need further tips, feel free to reach out!
Best,
Gila
Affiliate marketing is a great way to get started online, as it is an affordable way to build your own business without all the high costs you would normally incur before you make any profits. As you mentioned, it does take time, and there are also ups and downs all the time when Google changes their rules and overnight you could be dropped from the rankings. But perseverance and hard work will pay off in the end if you just hang in there.
Do you think one should go with safer platforms like Amazon that people trust, or venture into higher commission areas from less well known places?
Hi Michel,
Thank you for your great comment! I completely agree—affiliate marketing is a fantastic way to start building an online business with minimal upfront costs. As you mentioned, it does require patience, and the ups and downs (especially with changes in Google’s algorithms) are definitely part of the journey. But perseverance really does pay off!
As for your question, both approaches have their pros and cons. Safer platforms like Amazon offer the benefit of a well-established, trusted brand, which can make conversions easier because people are already familiar with them. However, the commissions tend to be lower. On the other hand, venturing into higher-commission areas from less well-known platforms can be more lucrative, but it may require more effort to build trust with your audience and educate them about the product or platform.
I think a balanced approach could be ideal—starting with a trusted platform to build your foundation and then expanding into higher-commission niches as you gain more experience and confidence.
Thanks again for sharing your thoughts, Michel! I’m excited to see where your affiliate journey takes you.
Best,
Gila