Email List Growth Strategies for Retiree Bloggers: Build Your List With a Lead Magnet (2026)
Last Updated on 1 day ago by Gila
Growing an email list is one of the most practical things a retiree affiliate blogger can do. Unlike search traffic that takes months to develop or social media reach that platform algorithms control, your email list grows in direct proportion to how many readers find your content useful enough to want more of it. Implementing effective email list growth strategies retiree bloggers can leverage is essential for success.
This guide covers the most effective list-building strategies for retiree bloggers — with particular emphasis on lead magnets, because a well-chosen lead magnet is consistently the fastest legitimate way to accelerate list growth.
This guide covers the most effective list-building strategies for retiree bloggers — with particular emphasis on lead magnets, because a well-chosen lead magnet is consistently the fastest legitimate way to accelerate list growth. Utilizing email list growth strategies retiree bloggers can adopt will enhance the effectiveness of these methods.
Affiliate disclosure: This post contains affiliate links. If you buy through them, I may earn a small commission at no extra cost to you.
TL;DR
- A lead magnet is a free, specific resource offered in exchange for an email address.
- The best lead magnets are short, specific, and immediately useful — not long ebooks.
- Your opt-in form placement matters as much as the lead magnet itself
- Pinterest is the best social platform for driving traffic to your email opt-in landing page
- Consistency beats tactics — publishing regularly and linking to your opt-in offer in every post grows lists steadily over time
- A small, engaged list of 300–500 subscribers outperforms a large disengaged list for affiliate income
Why Lead Magnets Work
Most readers who visit your blog for the first time will not subscribe without a reason. They enjoyed the post, found it helpful — and then left, possibly never to return. A lead magnet gives them a specific reason to stay connected.
The exchange is simple: you offer something genuinely useful, they provide their email address, and you begin a relationship that your blog post alone could not create.
The keyword is genuinely. A lead magnet that is vague, too long to consume quickly, or not specific to the reader’s immediate needs will not convert. A lead magnet that solves a specific problem your ideal reader has right now will.
What Makes a Good Lead Magnet

Specificity over breadth. A checklist titled “10 Things to Check Before Buying a Raised Bed Kit” converts better than an ebook called “The Complete Guide to Gardening After 60.” The specific checklist solves an immediate problem the reader has right now. The ebook covers a broad topic that they might get to.
Short enough to use immediately. The best lead magnets take under 10 minutes to consume and provide immediate value. A one-page checklist, a comparison chart, a resource list, and a five-step quick guide. Not a 30-page guide that goes in a folder and is never opened.
Aligned with your affiliate niche. Your lead magnet should attract the same reader who would buy the products you recommend. A gardening checklist attracts gardeners. A blogging tools list attracts bloggers. The closer the alignment between your lead magnet audience and your affiliate products, the higher your email affiliate income.
Easy for you to create. The best lead magnet is the one that actually gets created this week. A Canva-designed one-page checklist or a simple Google Doc formatted nicely and exported as a PDF is sufficient. Do not let perfectionism delay list building.
Lead Magnet Ideas for Retiree Bloggers
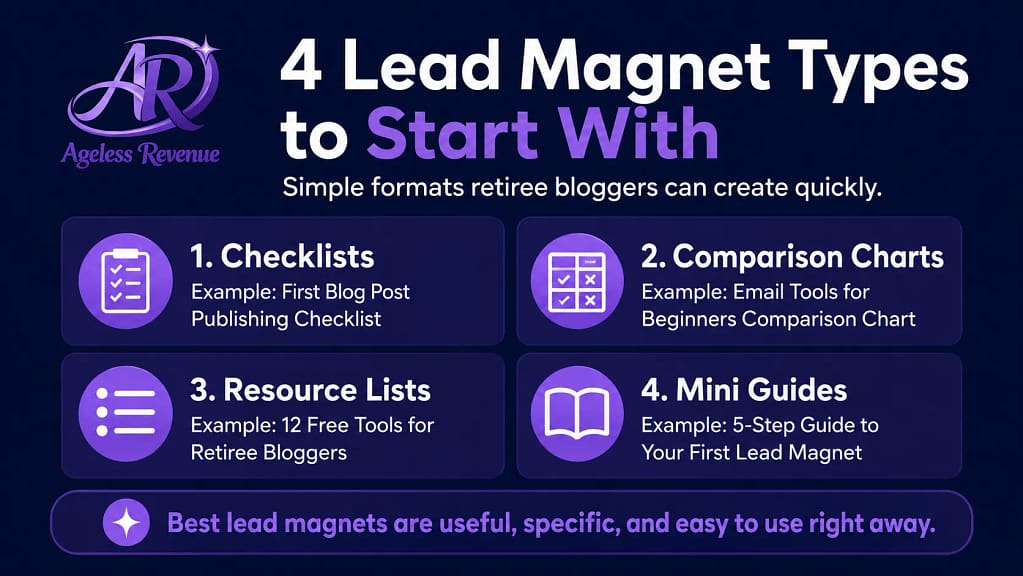
Checklists (easiest to create, high conversion):
- “Before You Buy a Raised Bed Kit: 10 Questions to Answer First”
- “The New Affiliate Blogger’s Setup Checklist: 15 Things to Do Before You Publish”
- “Pinterest Account Setup Checklist for Retiree Bloggers”
Comparison charts (high perceived value):
- “MailerLite vs Kit: Quick Comparison Chart for Retiree Bloggers”
- “5 Garden Kneelers for Seniors: Feature Comparison at a Glance”
- “Free AI Tools for Bloggers: What Each One Does Best”
Resource lists (quick to create, useful):
Email List Growth Strategies for Retiree Bloggers
- “The 8 Free Tools I Use to Run My Affiliate Blog”
- “My Favourite Accessible Gardening Resources — Websites, Books, and Suppliers”
- “Beginner’s Reading List: Affiliate Marketing Books Worth Your Time”
Mini guides (slightly more effort, high trust-building):
- “5 Pinterest Pins to Create This Week (With Examples).”
- “Your First Week With MailerLite: What to Set Up in Order”
- “How to Write Your About Page: A Simple Template for Retiree Bloggers”
How to Deliver Your Lead Magnet With MailerLite
Once you have created your lead magnet, you need a way to deliver it automatically to every new subscriber.
In MailerLite:
- Upload your lead magnet file to MailerLite’s file manager
- Create an automation that triggers on new subscriber signups
- The first email in the automation delivers the lead magnet with a download link
- Follow with your welcome sequence (see the email marketing pillar for the four-email template)
The delivery happens automatically — no manual work required after initial setup.
Where to Place Your Opt-In Forms
Having an excellent lead magnet is only half the equation. Your opt-in form needs to be visible in the right places.
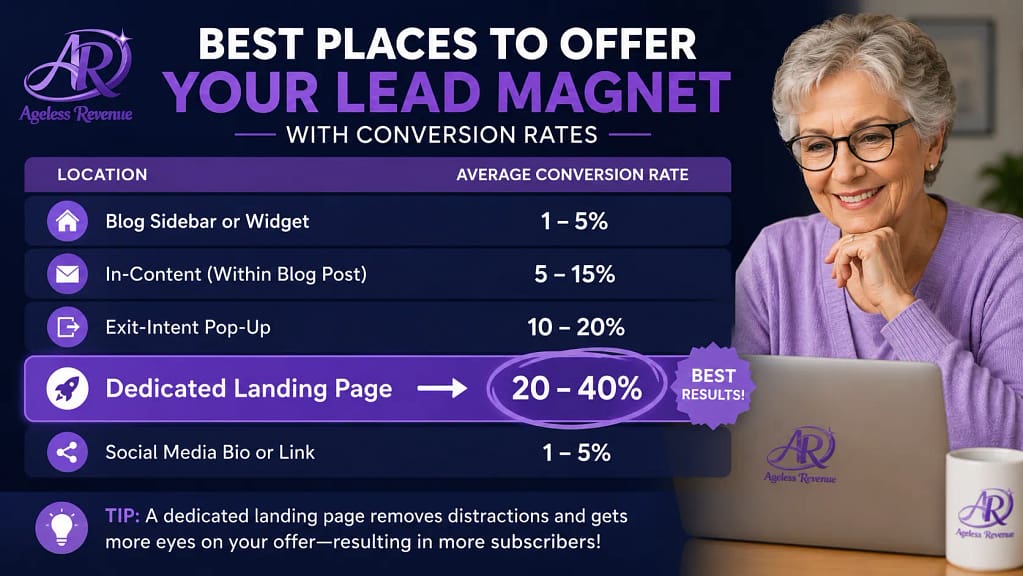
End of every blog post. Readers who finish a post are your most engaged visitors. An opt-in offer at the end of the post reaches them at peak interest. This typically converts at 1–3% of post readers.
Email List Growth Strategies Retiree Bloggers
Sidebar widget. Visible on every page of your site. Use a short, benefit-focused headline rather than just “Subscribe.” “Get the free checklist” performs better than “Join my newsletter.”
Dedicated landing page. A standalone page with no navigation menu, focused entirely on your lead magnet offer. This is the URL you share on Pinterest, in guest post bios, and whenever you talk about your lead magnet outside your blog. Landing pages with no distractions convert at significantly higher rates than embedded forms.
In-content form. Embedded naturally within a relevant section of a long post. For a post about choosing garden tools, a mid-post form offering a “Garden Tools Comparison Checklist” is contextually relevant and converts well.
Exit intent pop-up (optional, use sparingly). A pop-up that appears when the reader’s cursor moves toward the browser’s close button. These do increase opt-ins, but also annoy some readers. Test with care and ensure it is easy to dismiss.
Using Pinterest to Drive Email List Growth
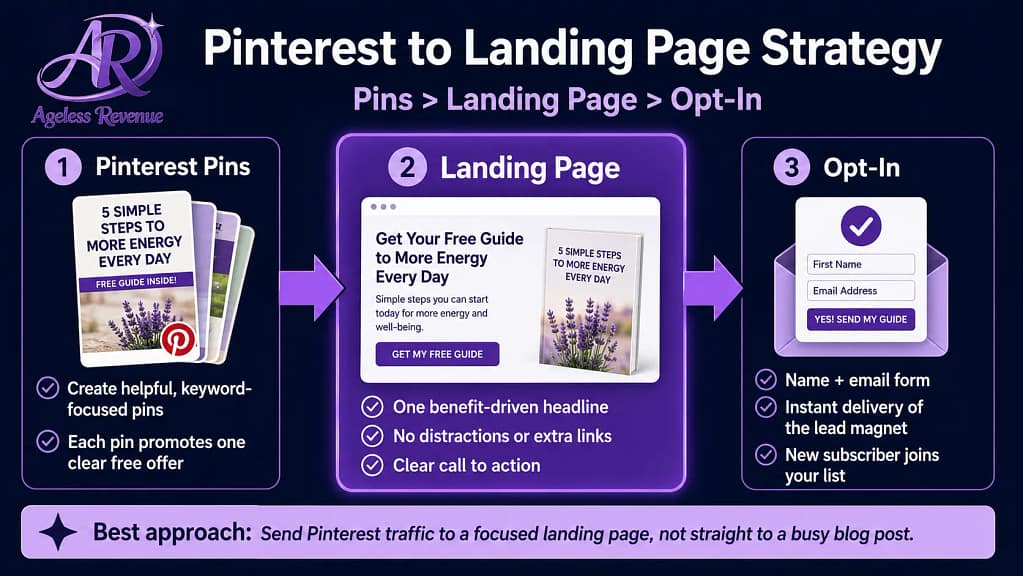
Pinterest is the most effective social platform for driving traffic to your email opt-in landing page — because Pinterest is a search engine, not a social feed.
Create three to five Pinterest pins specifically for your lead magnet. Each pin image should show the lead magnet (a mockup of the checklist or guide) with a clear text overlay: “Free: [Lead Magnet Title] — Click to Download.”
Link every pin directly to your dedicated landing page, not to your homepage or a general blog post. A reader who clicks a pin promoting a specific free resource and arrives at a focused landing page converts at a much higher rate than one who arrives at your homepage and has to find the opt-in themselves.
Schedule these pins regularly in your Pinterest workflow — they can drive opt-ins for months after you create them without any additional effort.
What to Do as Your List Grows
0–50 subscribers: focus on getting your lead magnet and welcome sequence working correctly. Test everything yourself. Read your own welcome sequence from the subscriber’s perspective. Adjust anything that feels impersonal or confusing.
50–200 subscribers: pay attention to open rates. Which subject lines get opened? Write more subject lines in that style. Note which email topics generate replies or clicks. Create more content like that.
200–500 subscribers: consider whether your lead magnet still matches what your blog covers. As your content evolves, your lead magnet should evolve too. Update or add a second opt-in offer for a different segment of your audience.
500+ subscribers: introduce segmentation — different subscriber groups who receive different content based on what they opted in for. MailerLite handles this straightforwardly with groups and segments.
Frequently Asked Questions
How long does it take to grow an email list to 100 subscribers?
With a specific lead magnet, consistent posting, and Pinterest traffic, most retiree bloggers reach 100 subscribers within 3–6 months. Without a lead magnet, relying only on a general newsletter sign-up, the same milestone typically takes 12+ months.
Should my lead magnet be a PDF or a webpage?
PDF is the standard and what most subscribers expect. It is easy to create in Canva or Google Docs, easy to deliver via MailerLite, and familiar to retiree audiences. A dedicated webpage works too, but requires more setup. Start with PDF.
How do I know if my lead magnet is converting well?
Track your landing page conversion rate in Google Analytics — the percentage of visitors who submit the opt-in form. Above 20% is good for a dedicated landing page. If it is below 10%, test a different headline or a more specific benefit statement.
Can I have more than one lead magnet?
Yes, and eventually you should. As your blog grows and covers multiple topics, having a different lead magnet for each main topic area allows you to build a more segmented, targeted list. Start with one and add a second once you have reached 200 subscribers.
Your Next Step
Choose one lead magnet idea from the list above — or identify the most common question your ideal reader asks and create a checklist that answers it. Create it in Canva or Google Docs, set it up in MailerLite with an automated delivery, and add an opt-in form to the end of your three most popular posts.
For the complete guide to email marketing for your affiliate blog, read Email Marketing for Retiree Bloggers.
For a structured path with training, tools, and community support, try Wealthy Affiliate free →
This post contains affiliate links. If you buy through them, I may earn a small commission at no extra cost to you.