
Last Updated on 3 weeks ago by Gila
When I first logged into my WordPress dashboard, I froze. There were dozens of menu items, buttons, settings, and options I didn’t understand. “Posts” versus “Pages”? “Blocks” and “Widgets”? “Permalink structures”?
I remember thinking: “I’ve made a terrible mistake. This is way too complicated for someone my age.”
But here’s what I learned within just a week: You only need to understand about 10% of WordPress to build a successful affiliate site. The other 90%? You’ll probably never touch it. And that 10% you do need? It’s actually pretty straightforward once someone explains it in plain English.
In 2026, WordPress powers over 43% of all websites on the internet—including sites run by retirees in their 60s, 70s, and 80s who started with zero technical experience. If they can master it, so can you.
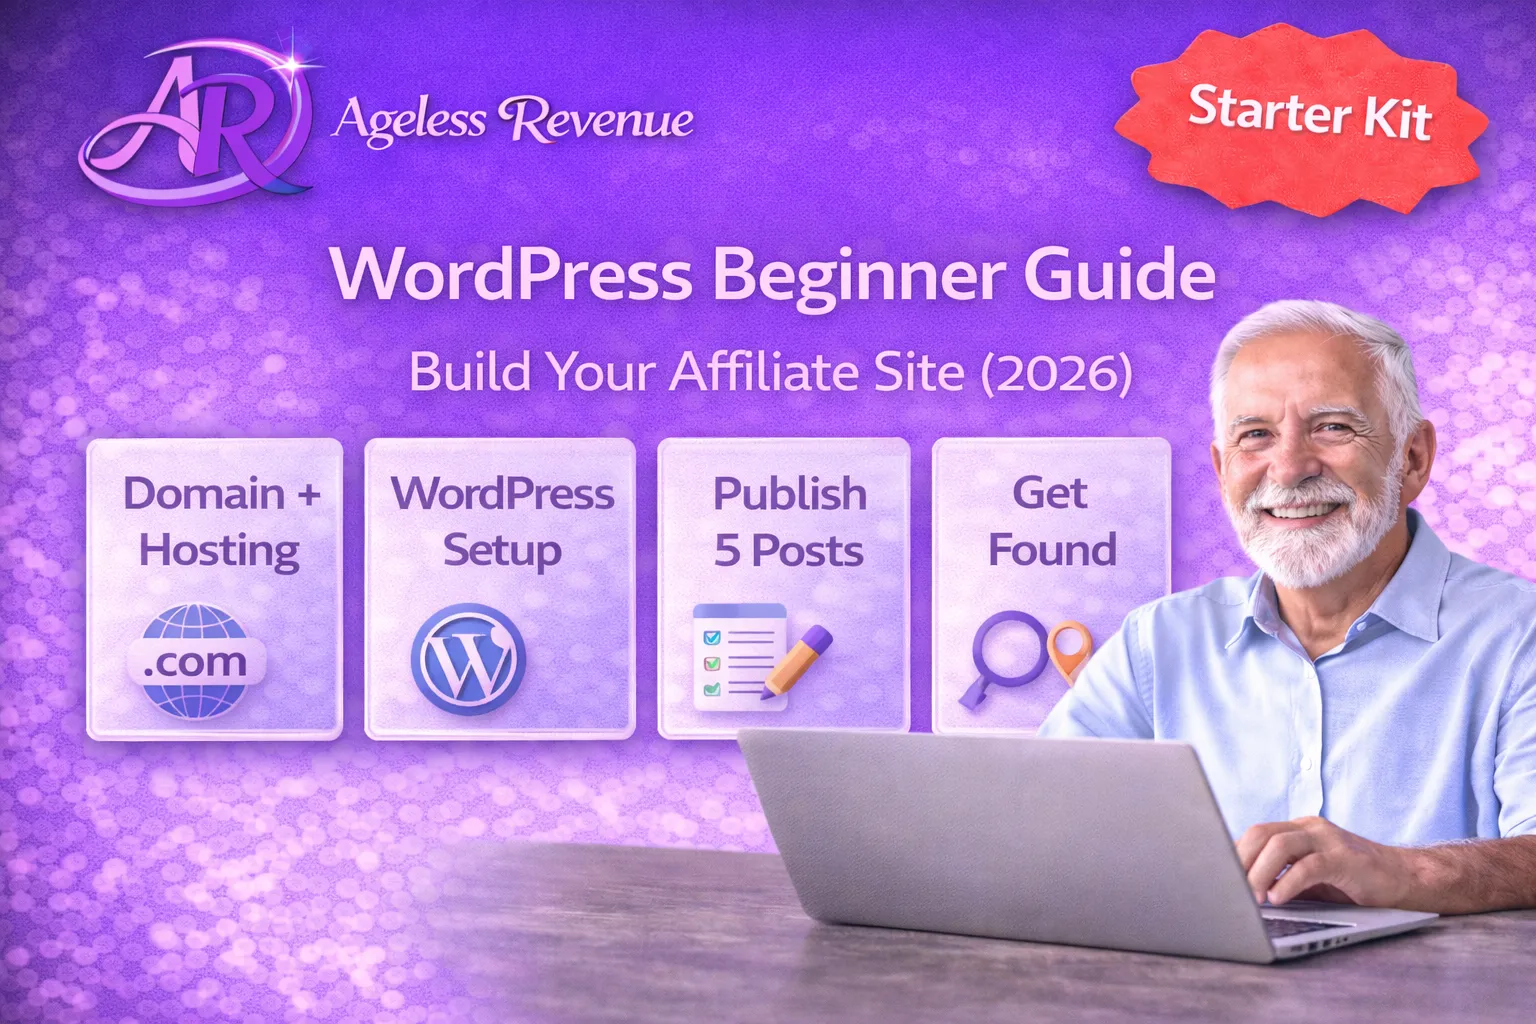
In this beginner’s guide, I’m going to walk you through exactly what you need to know to build and manage your affiliate site using WordPress. No confusing jargon. No overwhelming technical details. Just the essential skills that’ll have you confidently creating content and managing your site within days, not months.
By the end of this guide, you’ll know how to create pages and posts, add images and links, customize your site’s appearance, and troubleshoot common issues—everything you need to run a professional affiliate marketing website is in this guide, “WordPress Beginner Guide for Retirees”.
Ready to take control of your WordPress site? Let’s turn that intimidating dashboard into your comfortable workspace.
TL;DR – Quick Takeaways
Don’t have time to read the full guide? Here’s what you need to know:
- WordPress has two main content types: Pages (static, like About or Contact) and Posts (blog articles, dated)
- The Block Editor (Gutenberg) works like building with LEGO blocks—add paragraphs, images, buttons by clicking “+.”
- Wealthy Affiliate’s WordPress training includes video walkthroughs designed specifically for beginners
- You only need to learn 10% of WordPress features—focus on: Posts, Pages, Media, Appearance (themes)
- The dashboard is your control center—everything lives under those left-side menu items
- Backups happen automatically (especially with Wealthy Affiliate hosting)—you can’t permanently break anything
- Creating your first post takes about 10 minutes once you know where to click
- Themes control your site’s look—you can change them anytime in minutes without losing content
Bottom line: WordPress looks complicated, but you’ll use the same 5-6 features repeatedly. Master those basics, and you’re 90% of the way there.
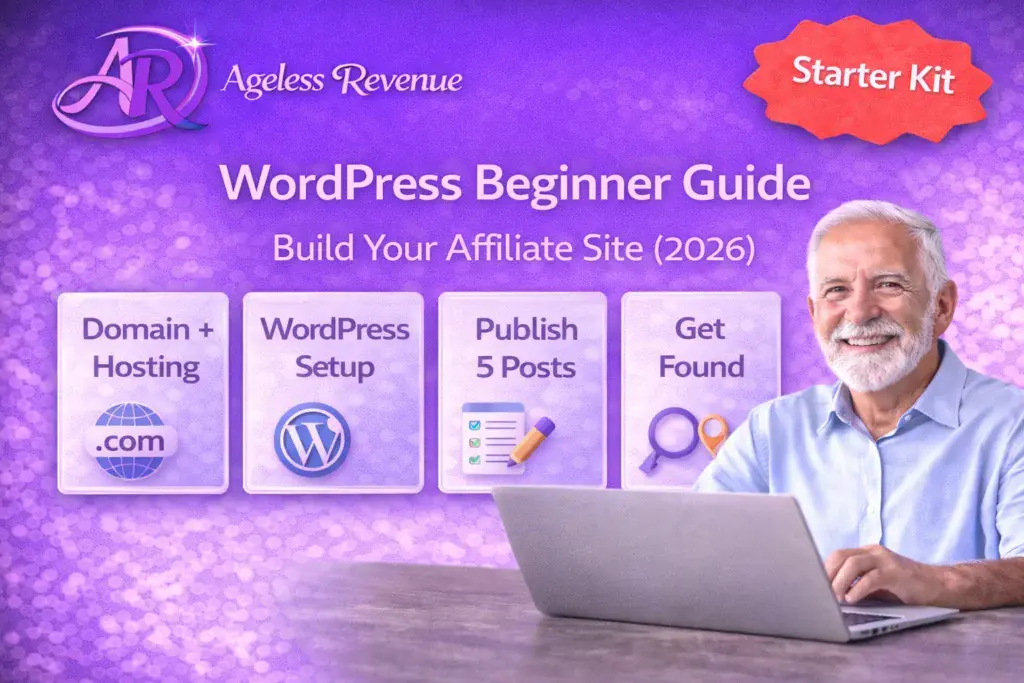
Understanding Your WordPress Dashboard: A Room-by-Room Tour
Think of your WordPress dashboard as the control room for your entire website. Every menu item on the left sidebar is like a different room in a house—each serves a specific purpose.
Let me give you a quick tour of what you’ll actually use (and what you can safely ignore for now).
The Main Menu Items You’ll Use Daily:
Posts (Your blog articles)
- This is where you’ll spend most of your time
- Every affiliate marketing article you write is a “Post.”
- Posts appear in reverse chronological order (newest first)
- They have categories, tags, and publish dates
Pages (Your permanent, static content)
- About Me, Contact, Privacy Policy, Affiliate Disclosure
- These don’t have dates and don’t appear in your blog feed
- You’ll create 3-5 pages total, then rarely touch them
Media (Your image library)
- All photos, screenshots, and graphics you upload
- Works like a photo album—upload once, reuse anywhere
- Automatically creates different sizes for different devices
Appearance (How your site looks)
- Themes: Change your site’s entire design in seconds
- Customize: Adjust colors, fonts, logos
- Menus: Create navigation (Home, About, Blog, etc.)
Plugins (Add features to your site)
- Like apps for your website
- We covered the 3 essential ones in your website setup guide
- Don’t install random plugins—only what you specifically need
Settings (Configuration options)
- You set most of these once and never change them
- We covered critical settings in the website setup guide
- Occasionally, you’ll come back here to adjust something specific
Menu Items You Can Safely Ignore (For Now):
- Comments (you’ll manage these if they appear, but not daily)
- Tools (advanced stuff you won’t need)
- Users (only matters if you have multiple people managing your site)
Here’s what I want you to understand: You don’t need to memorize every menu option. You’ll naturally remember the ones you use regularly (Posts, Media, Appearance), and the rest will be there when you occasionally need them.
WordPress has hundreds of features. You’ll use maybe 15-20 regularly. That’s totally normal and perfectly fine.
For a comprehensive tour with screenshots and video, WordPress.org offers beginner tutorials that walk through every dashboard section in detail.
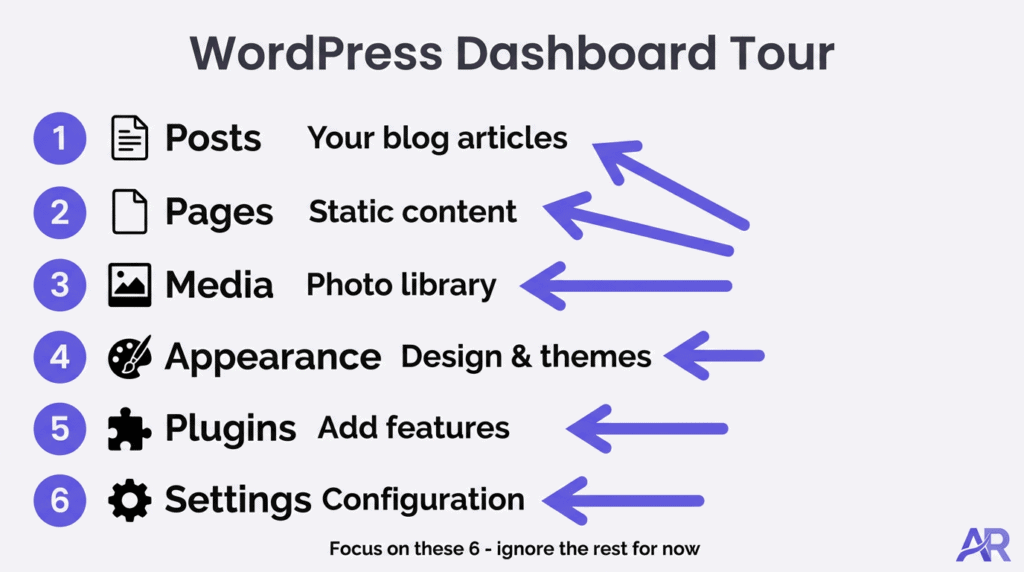
Posts vs Pages: Understanding the Two Content Types
This confuses every beginner, so let me make it crystal clear with real-world examples.
PAGES = Permanent Information (Rarely Changes)
Think of Pages as the foundation of your house—built once, modified rarely:
- About Me: Who you are, why you started this site, your story
- Contact: How people reach you
- Privacy Policy: Required legal page
- Affiliate Disclosure: FTC-required disclosure (learn more about affiliate disclosure requirements)
- Start Here: Optional page guiding new visitors
Characteristics of Pages:
- No publish date shown
- Don’t appear in your blog feed
- Not organized by categories or tags
- Usually linked in your main navigation menu
- You’ll create 3-7 total, rarely add more
POSTS = Your Blog Articles (Added Regularly)
Think of Posts as the furniture and decorations—you keep adding new pieces:
- Product reviews
- How-to guides
- Comparisons and roundups
- Personal stories and updates
- Any dated, timely content
Characteristics of Posts:
- Show publish date
- Appear in your blog feed (homepage, archives)
- Organized by categories and tags
- Display in reverse chronological order (newest first)
- You’ll create hundreds over time—this is your main content
Simple Rule:
Ask yourself: “Will I want to add more content like this regularly?”
- YES → It’s a Post (blog article)
- NO → It’s a Page (permanent information)
Real Example:
❌ Wrong: Creating your “10 Best Gardening Tools” article as a Page
✅ Right: Creating it as a Post (you’ll write many product reviews)
❌ Wrong: Creating your About Me as a Post
✅ Right: Creating it as a Page (you have one About page, rarely update it)
Why This Matters:
Search engines treat Posts and Pages differently. Blog posts (Posts) can rank for many different keywords over time. Pages are typically for navigation and legal requirements, not your main content strategy.
Your affiliate income comes primarily from Posts—product reviews, comparisons, and how-to guides. You’ll write dozens (eventually hundreds) of Posts. But you’ll probably create fewer than 10 Pages total.
Creating Your First Blog Post: The Block Editor Explained
The WordPress Block Editor (also called Gutenberg) replaced the old clunky editor a few years ago. It’s actually quite intuitive once you understand the concept: Everything is a block.
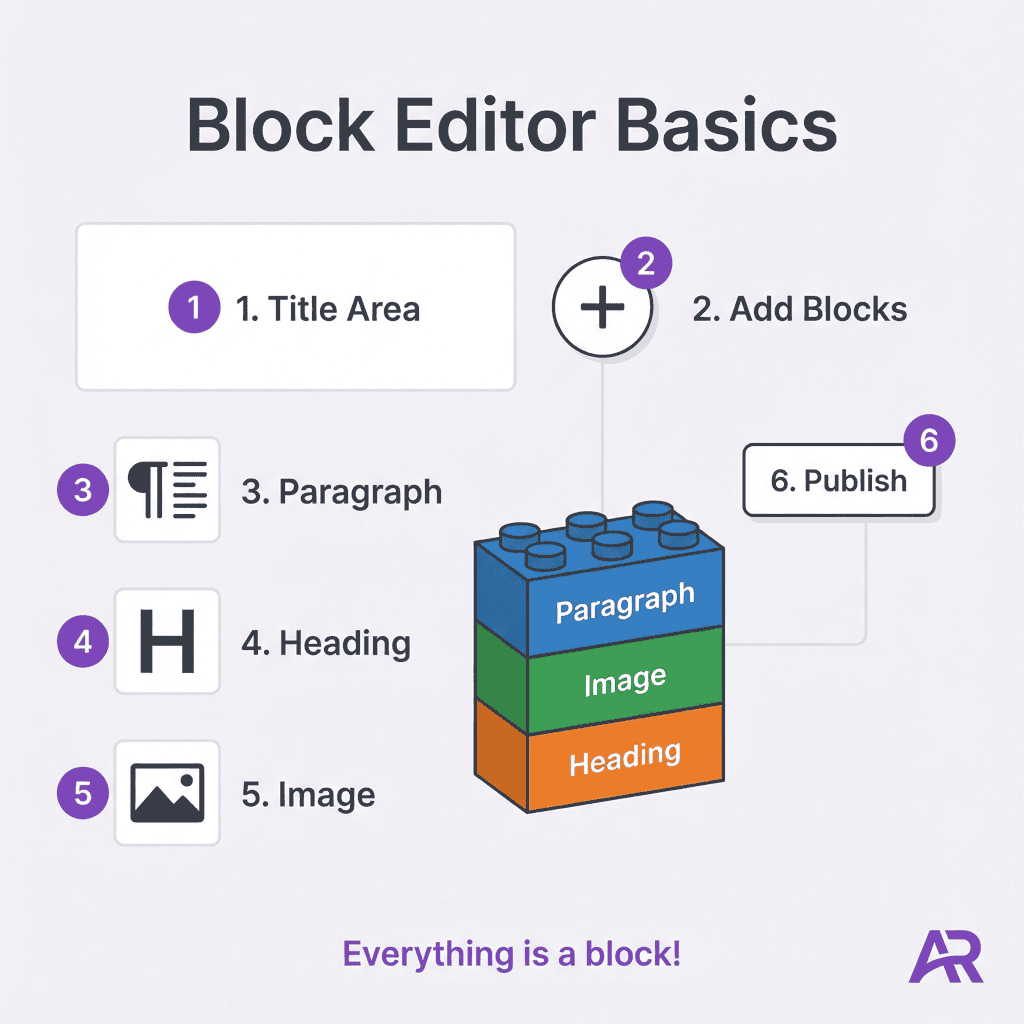
What’s a Block?
A block is a single piece of content: a paragraph, an image, a heading, a button, a list. You build your post by stacking blocks vertically, like LEGO pieces.
Creating Your First Post (Step-by-Step):
Step 1: Click “Posts” → “Add New”
You’ll see a blank canvas with:
- Title area at the top (“Add title”)
- A “+” button to add your first block
- A toolbar with options
Step 2: Add Your Title
Click where it says “Add title” and type your post title:
- Example: “5 Ergonomic Gardening Tools for Seniors with Arthritis”
- Keep it clear, descriptive, and keyword-rich
Step 3: Add Your First Paragraph Block
Click the “+” button and select “Paragraph” (it’s usually the first option).
Start typing. Just like a word processor.
To start a new paragraph, press Enter. WordPress automatically creates a new paragraph block.
Step 4: Add a Heading
Press Enter for a new block, click “+”, select “Heading.”
Choose your heading level:
- H2 for main sections
- H3 for subsections
- Never use H1 (your title is already H1)
Step 5: Add an Image
Click “+”, select “Image.”
You can:
- Upload from your computer
- Select from your Media Library (images you’ve uploaded before)
- Insert from URL (if the image is already online)
Pro tip: Always add “ALT text” in the image settings (right sidebar) for SEO and accessibility.
Step 6: Add a Link
Highlight any text in your paragraph, then click the link icon (chain symbol) in the toolbar.
Paste your URL (like your affiliate link), press Enter.
Check the box “Open in new tab” if you want links to open in new windows.
Step 7: Add Other Useful Blocks
List Block:
- Click “+”, select “List”
- Choose Bulleted or Numbered
- Type each item, press Enter for a new bullet
Button Block:
- Click “+”, select “Button”
- Type button text (e.g., “Check Price on Amazon”)
- Add your affiliate link in the link field
- Choose button color and style
Quote Block:
- Click “+”, select “Quote”
- Perfect for highlighting key points or testimonials
Step 8: Preview Your Post
Before publishing, click “Preview” (top right) to see how it looks to visitors.
Check:
- Formatting looks good
- Images display properly
- Links work correctly
- No weird spacing or errors
Step 9: Set Categories and Tags
In the right sidebar:
- Categories: Choose 1-2 main categories (e.g., “Product Reviews,” “Gardening Tips”)
- Tags: Add 3-5 specific tags (e.g., “ergonomic tools,” “arthritis,” “seniors”)
Step 10: Add Your Focus Keyword (If Using SEOPress)
Scroll down to the SEOPress section below your content:
- Enter your target keyword
- SEOPress will guide you through optimization (green checkmarks are good)
Step 11: Publish!
When ready, click the blue “Publish” button (top right).
Confirm by clicking “Publish” again.
Your post is now live!
Don’t Worry About Perfection:
Your first post will feel awkward. That’s normal. By your 5th post, you’ll be comfortable. By your 20th, you won’t even think about it.
The block editor has extensive documentation from WordPress with screenshots and videos if you want to explore more advanced blocks.
Essential Post Settings: Categories, Tags, and Featured Images
These three settings determine how your content is organized and displayed. Let’s break them down:
Categories: Your Main Content Buckets
Think of categories like sections in a bookstore: Fiction, Non-Fiction, Biography, etc.
How to use them:
- Create 3-7 broad categories maximum
- Every post should have 1-2 categories (rarely more)
- Categories appear in your site navigation
Example Categories for a Gardening Affiliate Site:
- Product Reviews
- Growing Guides
- Gardening Tips
- Container Gardening
- Tool Comparisons
How to add categories:
- Edit your post
- Right sidebar → “Post” tab → “Categories”
- Check existing categories or click “Add New Category.”
Pro tip: Don’t create too many categories. If you have 20+ categories, you’re over-organizing. Broader is better.
Tags: Specific Keywords for Organization
Tags are like keywords on the spine of a book. They’re more specific than categories.
How to use them:
- Add 3-7 tags per post
- Be specific: “heirloom tomatoes,” not just “tomatoes.”
- Tags help readers find related content
- Not displayed in main navigation (usually)
Example Tags for a Gardening Post:
- vertical gardening
- small space solutions
- balcony gardens
- raised beds
- container plants
How to add tags:
- Edit your post
- Right sidebar → “Post” tab → “Tags”
- Type tag name, press Enter (or comma) to add multiple
Featured Image: Your Post’s Main Visual
This is the image that represents your post in:
- Blog feed (homepage)
- Social media shares
- Search results (sometimes)
How to set it:
- Edit your post
- Right sidebar → “Post” tab → “Featured Image”
- Click “Set featured image.”
- Upload or select from Media Library
Featured Image Tips:
- Use high-quality images (at least 1200px wide)
- Horizontal images work best (16:9 ratio)
- Make sure the image relates to your content
- Add descriptive file name before uploading (e.g., “gardening-tools-seniors.jpg”, not “IMG_1234.jpg”)
Why These Matter:
Categories and tags help readers find related content. If someone reads your tomato review, they can click the “Product Reviews” category or the “tomatoes” tag to see similar posts.
Featured images make your site look professional and visual. Posts without featured images look incomplete and unprofessional.
Set these three elements for every single post. It takes 60 seconds and dramatically improves user experience.
Choosing and Customizing Your WordPress Theme
Your theme controls how your entire site looks—colors, fonts, layout, spacing. The good news? You can change themes anytime without losing any content.
What Themes Control:
- Overall design and layout
- Color schemes
- Font choices
- Header and footer design
- Sidebar locations
- Mobile responsiveness
What Themes DON’T Control:
- Your actual content (posts, pages)
- Your images
- Your settings
- Your plugins
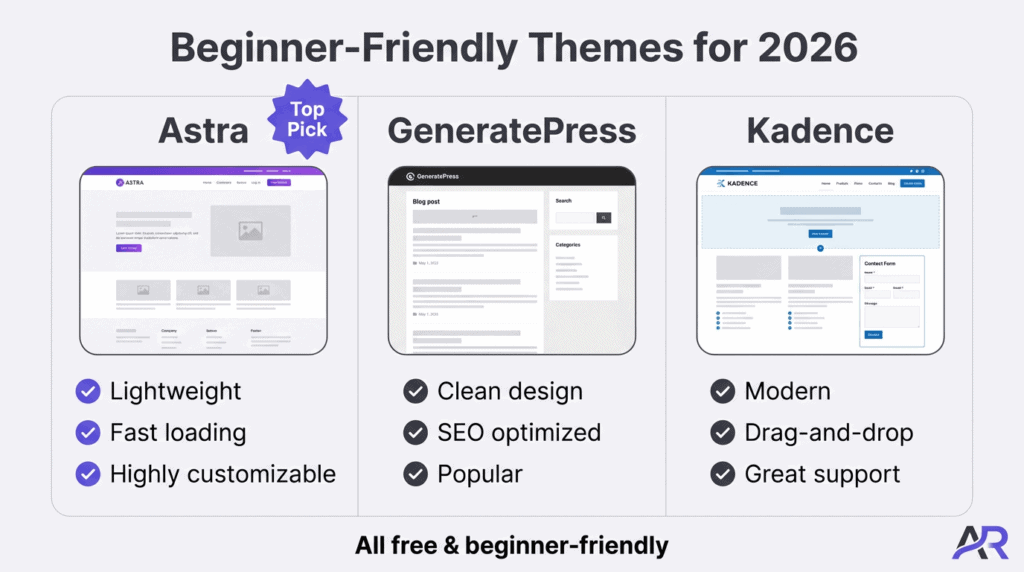
Beginner-Friendly Themes for Affiliate Sites (2026):
Astra (My top recommendation)
- Lightweight and fast-loading
- Highly customizable without code
- Perfect for affiliate content
- The free version is excellent
- Download from WordPress.org
GeneratePress
- Clean, professional design
- Excellent for SEO
- Very popular among affiliate marketers
- Fast performance
- Download from WordPress.org
Kadence
- Beautiful modern designs
- Drag-and-drop customization
- Beginner-friendly
- Great support documentation
- Download from WordPress.org
How to Install a New Theme:
- Dashboard → Appearance → Themes
- Click “Add New”
- Search for theme name (e.g., “Astra”)
- Click “Install”
- Click “Activate”
That’s it. Your site now uses the new theme.
Basic Theme Customization:
- Dashboard → Appearance → Customize
- You’ll see a live preview of your site
- Left sidebar has options:
- Site Identity: Upload logo, add tagline
- Colors: Change primary color, background colors
- Typography: Choose fonts, sizes
- Header: Adjust header layout and settings
- Footer: Customize footer content
- Make changes and see them update in real-time
- Click “Publish” when satisfied
My Advice for Beginners:
Start with minimal customization. Change your site colors to match your brand, upload a simple logo, and leave everything else default.
You can always customize more later. Right now, focus on creating great content. A simple, clean theme with default settings is perfectly professional.
Don’t theme-hop. Pick one theme and stick with it for at least 6 months. Constantly changing themes wastes time and can cause layout issues.
Wealthy Affiliate members get optimized themes pre-configured for affiliate marketing, which saves hours of customization work. Learn more in the Wealthy Affiliate training platform.
Adding Media: Images, Videos, and Files
Your Media Library is where all your visual content lives. Let’s make sure you’re managing it properly.
Uploading Images:
Method 1: While Editing a Post
- Click “+” to add block
- Select “Image”
- Click “Upload” and choose a file
- Image is added to both your post AND Media Library
Method 2: Directly to Media Library
- Dashboard → Media → Add New
- Drag files or click “Select Files.”
- Images are stored for future use
Image Best Practices:
Before Uploading:
- Resize images to reasonable dimensions (1200-2000px wide maximum)
- Compress images to reduce file size (use free tools like TinyPNG.com)
- Rename files descriptively: “vertical-garden-planter.jpg” not “IMG_5678.jpg”
After Uploading:
- Add descriptive ALT text (for SEO and accessibility)
- Add title and caption if relevant
- Choose alignment (left, center, right, full-width)
Image Sizes:
WordPress automatically creates multiple sizes of each image:
- Thumbnail (small)
- Medium (mid-size)
- Large (big)
- Full (original)
This ensures fast loading on different devices. Don’t worry about creating these manually—WordPress does it automatically.
Adding Videos:
YouTube/Vimeo Embeds (Recommended):
- Add new block → search “YouTube” or “Video.”
- Paste video URL
- WordPress embeds it responsively
Don’t upload video files directly to WordPress—they’re huge and will slow your site down. Always use YouTube or Vimeo hosting.
PDF Files and Downloads:
- Dashboard → Media → Add New
- Upload your PDF file
- In your post, add a “File” block
- Select your PDF
- Visitors can click to download
Media Library Organization:
Unfortunately, WordPress doesn’t have built-in folders for organizing media. But you can:
- Use descriptive file names so the search works
- Install a plugin like “FileBird” if you need folders (optional)
- Delete unused images periodically to keep the library clean
Image Copyright Warning:
Only use images you have permission to use:
- Your own photos
- Stock photos (Unsplash, Pexels, Pixabay are free)
- Images you purchased (Shutterstock, iStock)
- Product images from affiliate programs (usually permitted in promotional materials)
Never just grab images from Google Image Search—that’s copyright infringement and can get you sued.
Creating Essential Pages: About, Contact, and Legal Pages
Before you start publishing blog posts, set up these foundational pages. You’ll create them once and rarely update them.
Page 1: About Me / About Page
What to include:
- Your name and photo (optional, but builds trust)
- Your story: Why you started this site
- Your expertise/background
- What readers will find on your site
- Personal touch: hobbies, interests that relate to your niche
Length: 300-500 words
Why it matters: People want to know who’s behind the recommendations. Your authentic story builds trust and differentiates you from corporate sites.
Page 2: Contact Page
What to include:
- Contact form (use Contact Form 7 plugin – free)
- Or list your email address
- Set expectations: “I reply within 48 hours.”
- Optional: Social media links
Why it matters: Readers want to reach you. Brands want to contact you for partnerships. Having no contact option looks unprofessional.
Page 3: Privacy Policy
What to include:
- What data do you collect (email addresses, comments, cookies)
- How you use that data
- Third-party services (Google Analytics, email provider)
- User rights
Easy solution: WordPress has a built-in Privacy Policy generator:
- Dashboard → Settings → Privacy
- Click “Create New Page”
- WordPress provides a template
- Customize for your specific situation
Why it matters: Required by law in many jurisdictions (GDPR, CCPA). Also required to use Google Analytics and most ad networks.
Page 4: Affiliate Disclosure
What to include:
- Clear statement that you earn commissions from affiliate links
- Explanation that readers pay the same price
- Statement that you only recommend products you’ve used or researched
- FTC compliance language
Template available: Download a free template from the FTC website or use the one in your affiliate disclosure guide.
Why it matters: Required by FTC law in the US. Failing to disclose can result in fines. Plus, it builds trust with readers.
How to Create Pages:
- Dashboard → Pages → Add New
- Add title (e.g., “About Me”)
- Write your content using blocks (just like posts)
- Click “Publish”
Adding Pages to Your Navigation Menu:
- Dashboard → Appearance → Menus
- Select your menu (usually “Primary Menu”)
- Check the boxes next to your pages
- Click “Add to Menu”
- Drag to reorder
- Click “Save Menu”
Typical Menu Structure:
- Home
- Blog (or “Articles”)
- About
- Contact
Privacy Policy and Affiliate Disclosure usually go in the footer, not the main navigation.
Basic Troubleshooting: Common Issues and Quick Fixes
Even with the most user-friendly setup, you’ll occasionally run into small issues. Here are the most common problems beginners face and how to fix them:
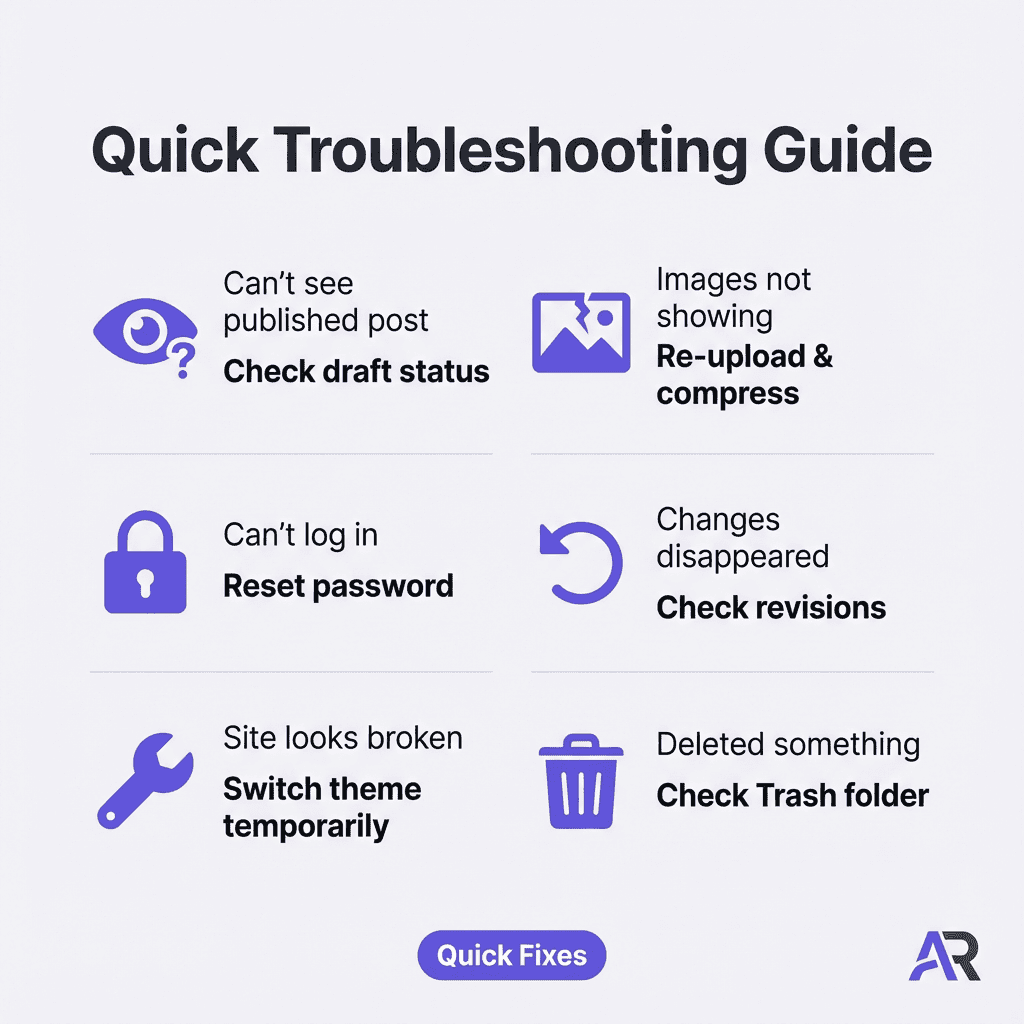
Problem 1: “I published my post, but can’t see it on my site.”
Likely causes:
- You saved it as a “Draft” instead of publishing
- You set it to publish in the future
- Caching issue (your browser is showing an old version)
Fixes:
- Go to Posts → All Posts and check the status
- If it says “Scheduled,” click it and change to “Publish immediately.”
- Clear your browser cache (Ctrl+F5 on PC, Cmd+Shift+R on Mac)
- Check in an incognito/private browser window
Problem 2: “My images aren’t showing up.”
Likely causes:
- File size too large (WordPress limits vary)
- The image didn’t upload completely
- Broken file path
Fixes:
- Try re-uploading the image
- Compress large images before uploading (use TinyPNG.com)
- Check that the image actually appears in the Media Library
- Try a different file format (convert to JPG if using PNG)
Problem 3: “I can’t log into my dashboard.”
Likely causes:
- Wrong password
- Wrong URL (trying to log in at the wrong site)
- Browser cookies/cache issue
Fixes:
- Use the “Lost your password?” link on the login screen
- Make sure you’re at yoursite.com/wp-admin (correct URL)
- Clear browser cookies and cache
- Try a different browser
- Contact your host (Wealthy Affiliate support) if still stuck
Problem 4: “My changes disappeared after I clicked Update”
Likely causes:
- Didn’t actually click “Update” successfully
- Plugin conflict is interfering with saves
- Browser session timed out
Fixes:
- Check “Revisions” (in right sidebar when editing)—you can restore previous versions
- Make changes again (they weren’t saved)
- Disable plugins temporarily to test for conflicts
Problem 5: “My site looks broken / weird layout.”
Likely causes:
- Theme conflict with plugin
- Customization error
- Caching issue
Fixes:
- Switch to a default WordPress theme (Twenty Twenty-Four) temporarily to test
- If that fixes it, the issue is theme-related
- Clear all caches (browser, plugin caches, hosting cache)
- Deactivate plugins one by one to find the culprit
Problem 6: “I accidentally deleted something important.”
Likely causes:
- You clicked Delete instead of Update
- Accidental deletion in Media Library
Fixes:
- Check “Trash” (in Posts, Pages, or Media)
- Restore from there if found
- If permanently deleted, restore from backup (Wealthy Affiliate does automatic backups)
- Contact support for backup restoration help
When to Ask for Help:
If you’ve tried the obvious fixes and are still stuck after 15 minutes, ask for help:
- WordPress.org support forums
- Your hosting support (Wealthy Affiliate has excellent support)
- Your theme’s documentation/support
- YouTube tutorials for your specific issue
Pro tip: Before asking for help, write down:
- Exactly what you did
- What you expected to happen
- What actually happened
- Any error messages (copy/paste the exact text)
This helps support staff diagnose issues faster.
Frequently Asked Questions (FAQ)
Q: How often should I publish new blog posts?
A: For beginners, aim for 2-3 quality posts per week. Consistency matters more than frequency. It’s better to publish 2 great posts every week for a year than 10 mediocre posts one week and then nothing for months. Most successful affiliate sites publish 2-4 times per week once established.
Q: Should I approve comments automatically or moderate them first?
A: Set comments to require manual approval, at least initially. This prevents spam from appearing on your site immediately. Once you’re comfortable recognizing legitimate comments vs spam, you can adjust settings. Dashboard → Settings → Discussion → “Comment must be manually approved” should be checked.
Q: Can I edit a post after it’s published?
A: Absolutely! That’s one of the beauties of digital publishing. Go to Posts → All Posts, click the title, make changes, and click “Update.” Your updates go live immediately. It’s good practice to add a note at the bottom if you make major changes: “Updated January 2026 with new product information.”
Q: What happens if I switch themes? Will I lose my content?
A: No! All your posts, pages, images, and settings remain intact when you switch themes. Only the visual design changes. However, some theme-specific settings (like custom sidebars or special widgets) may need reconfiguration. Always preview a new theme before activating it permanently.
Q: How do I know if my site has been hacked?
A: Warning signs include: redirects to strange websites, unexpected pop-ups, content you didn’t write appearing, inability to log in, or warnings from Google Search Console. Prevention is easier than fixing: keep WordPress and plugins updated, use strong passwords, and use hosting with good security (like Wealthy Affiliate). If you suspect hacking, contact your host immediately.
Q: Can I have someone else write posts while I manage the site?
A: Yes. Go to Users → Add New. Create an account with “Author” or “Contributor” role (not “Administrator”). Authors can publish posts, and contributors can write but not publish (you review first). This is useful if you hire writers or have a partner helping with content. Always use the minimum permissions needed.
Conclusion: You’re Ready to Build Your Affiliate Site
Let’s recap what you now know how to do with WordPress:
✅ Navigate your dashboard confidently
✅ Understand the difference between Posts and Pages
✅ Create blog posts using the Block Editor
✅ Add images, links, and formatted content
✅ Organize content with categories and tags
✅ Customize your site’s appearance with themes
✅ Create essential pages (About, Contact, Legal)
✅ Troubleshoot common issues independently
This is huge. You now have the fundamental skills to build and manage a professional affiliate website. Are there more advanced WordPress features? Sure. Do you need them right now? Absolutely not.
Here’s what I want you to remember: WordPress mastery comes from doing, not reading. Your first 5 posts will feel clunky. Your 10th post will feel smoother. By your 20th post, you won’t even think about the mechanics—you’ll just write.
The difference between people who succeed with affiliate marketing and those who quit early isn’t technical skill. It’s consistency. Keep creating helpful content, keep learning from your audience, and keep refining your approach.
You’ve got this. WordPress is just a tool—and you now know how to use it effectively.
Your next immediate actions:
- Create your About page (tell your story)
- Write your first blog post (pick something you know well)
- Set up your essential legal pages (Privacy Policy, Affiliate Disclosure)
- Customize your theme basics (colors, logo, if you have one)
- Publish consistently (set a schedule: 2 posts per week)
Ready to master WordPress with hands-on video training and expert support?
Join Wealthy Affiliate and get access to:
- WordPress video tutorials specifically for beginners (no technical jargon)
- Step-by-step training on creating high-converting affiliate content
- Built-in WordPress hosting optimized for affiliate sites (faster, more secure)
- 24/7 support from experienced WordPress users who remember being beginners
- A community of retirees successfully running WordPress affiliate sites in 2026
No credit card required to start exploring. Just your willingness to learn a skill that’ll give you complete control over your online business.
WordPress isn’t just a blogging platform—it’s the foundation of your affiliate income. Master it, and you’ve unlocked the ability to build a sustainable online business that generates income for years to come.
Let’s build something amazing together.
Last updated: January 2026