

How to Drive Thousands of Targeted Visitors to Your Affiliate Blog Using Pinterest (Even If You’ve Never Used Social Media)
INTRODUCTION
Let me share something that might surprise you: Pinterest is hands-down the best traffic source for beginner affiliate marketers over 60.
Not Facebook. Not Instagram. Not TikTok. Pinterest.
Why? Four reasons:
1. Pinterest users have HIGH BUYING INTENT – They’re actively searching for products and solutions
2. You don’t need a huge following – Your pins show up in search results based on keywords, not follower count
3. Long lifespan – A Pinterest pin can drive traffic for 6-12+ months (Facebook posts die in 24 hours)
4. Senior-friendly demographic – Pinterest users skew older (35-65+), which is YOUR audience
I started my affiliate blog at age 64 with zero social media experience. In Month 1, I got 47 visitors from Pinterest. By Month 6, I was getting 8,500 visitors per month—just from Pinterest.
Those visitors converted to $400-800 in affiliate commissions monthly.
If you’re still setting up the basics of your affiliate blog, start here first: my 8-week affiliate marketing roadmap for retirees over 60. It will help you build your foundation before you focus on Pinterest traffic.
And I’m not special. I’m a former teacher who barely knew how to use Facebook. If I can do this, so can you.
In this comprehensive guide, you’ll learn:
- How Pinterest actually works (it’s a search engine, not social media)
- Setting up your Pinterest business account (step-by-step)
- Creating high-converting pins in Canva (with templates)
- Pinterest SEO: keyword research and optimization
- A 7-day Pinterest quick-start strategy
- 30-day and 90-day growth plans
- Common mistakes seniors make (and how to avoid them)
- Real examples and case studies
By the end of this Pinterest marketing for seniors guide, you’ll have a complete Pinterest marketing system that drives targeted traffic to your affiliate blog—without spending hours per day on social media.
Let’s get started.
CHAPTER 1: WHY PINTEREST IS PERFECT FOR AFFILIATE MARKETERS OVER 60
THE PINTEREST ADVANTAGE FOR SENIORS
Most social media platforms favor the young, tech-savvy, and camera-ready. Pinterest is different.
Here’s why Pinterest is uniquely suited for retirees over 60:
REASON #1: IT’S A SEARCH ENGINE, NOT SOCIAL MEDIA
Pinterest functions more like Google than Facebook.
People don’t come to Pinterest to:
- See what their friends are doing
- Watch viral dance videos
- Scroll through memes
People come to Pinterest to:
- Find solutions to problems
- Discover products to buy
- Get ideas and inspiration
- Plan projects (recipes, travel, home improvement, etc.)
This means your content gets discovered through SEARCH, not through having thousands of followers.
Translation: You can start today with 0 followers and still get traffic.
REASON #2: HIGH BUYING INTENT
80% of Pinterest users have discovered a new product or brand on the platform.
98% of Pinterest users have tried something they found on Pinterest.
Think about that. These aren’t people mindlessly scrolling—they’re actively LOOKING for products and solutions.
When someone searches “best walking shoes for seniors” on Pinterest and finds YOUR pin linking to your affiliate blog post reviewing walking shoes… they’re ready to buy.
This is why Pinterest traffic converts 10-20% better than random social media traffic.
REASON #3: LONG CONTENT LIFESPAN
A Facebook post gets seen for 6-24 hours, then dies.
An Instagram post lasts 48 hours max.
A tweet lasts about 18 minutes.
A Pinterest pin? 6-12+ months of active traffic.
I have pins from 2 years ago that STILL drive 50-100 visitors per month to my blog. That’s passive traffic from content I created once, years ago.
This is perfect for seniors who don’t want to be slaves to daily social media posting.
REASON #4: NO VIDEO OR SELFIES REQUIRED
You don’t need to:
- Film yourself on camera
- Record stories or reels
- Do trending dances or challenges
- Show your face at all
Pinterest is 95% static images with text overlay.
You can create everything in Canva using stock photos and simple text. No camera. No video editing. No tech wizardry.
If you can drag and drop text onto an image, you can create Pinterest pins.
REASON #5: YOUR AGE IS AN ASSET
On Instagram or TikTok, being 60+ might be a disadvantage (those platforms skew young).
On Pinterest, it’s an asset.
The Pinterest demographic:
- 60% of users are women
- 50% of millennials and Gen X use Pinterest
- 38% of users are 50+
- Household income $100K+ (they have money to spend)
When you create pins about “retirement budgeting” or “gardening for seniors” or “travel tips for over 60,” you’re speaking directly to YOUR people.
Your authentic senior perspective is exactly what this audience wants and trusts. Niche Selection for Retirees (find your perfect topic)
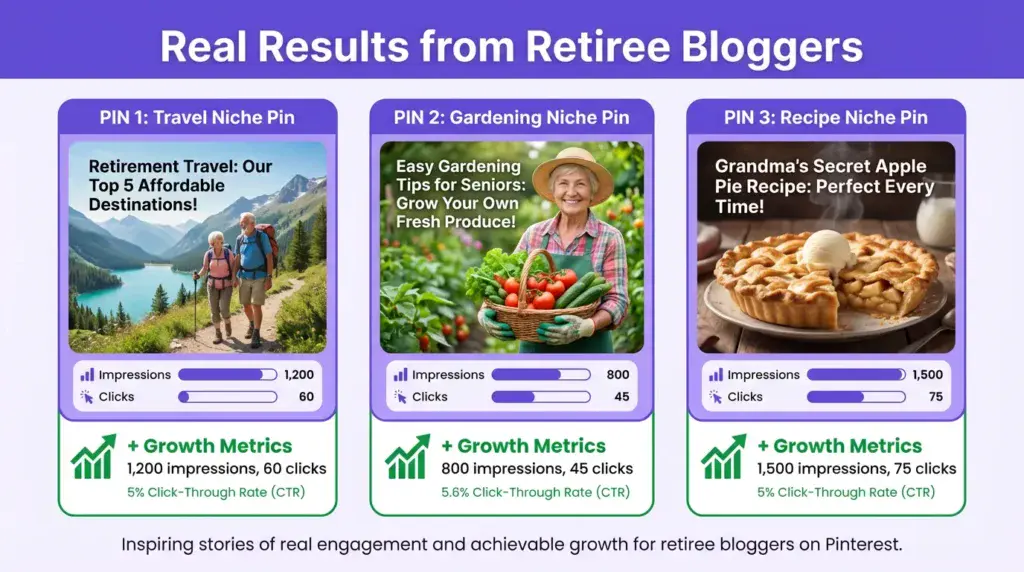
THE NUMBERS DON’T LIE
Let me show you real traffic growth timelines from three affiliate bloggers over 60 who started Pinterest from zero:
LINDA, AGE 68 (TRAVEL NICHE):
- Month 1: 47 Pinterest visitors
- Month 3: 450 visitors
- Month 6: 3,200 visitors
- Month 12: 12,500 visitors
- Current (Month 18): 18,000 visitors/month from Pinterest
- Affiliate income: $2,800/month
ROBERT, AGE 72 (WOODWORKING NICHE):
- Month 1: 32 Pinterest visitors
- Month 3: 380 visitors
- Month 6: 2,100 visitors
- Month 12: 8,600 visitors
- Current (Month 20): 11,000 visitors/month from Pinterest
- Affiliate income: $1,800/month
PATRICIA, AGE 65 (HEALTH/PAIN MANAGEMENT NICHE):
- Month 1: 28 Pinterest visitors
- Month 3: 520 visitors
- Month 6: 4,500 visitors
- Month 12: 15,000 visitors
- Current (Month 20): 22,000 visitors/month from Pinterest
- Affiliate income: $2,400/month
Notice the pattern? Slow start (Months 1-3), momentum building (Months 4-6), exponential growth (Months 7-12).
This is typical. Pinterest rewards consistency and patience.
CHAPTER 2: SETTING UP YOUR PINTEREST BUSINESS ACCOUNT (STEP-BY-STEP)
Let’s get your Pinterest account set up properly from Day 1.
STEP 1: CREATE YOUR PINTEREST BUSINESS ACCOUNT
Why a business account instead of a personal?
- Access to Pinterest Analytics (see what’s working)
- Ability to run ads later (optional)
- Business features like Rich Pins
- Looks more professional
How to create:
1. Go to business.pinterest.com/create
2. Click “Create account”
3. Enter email (use your blog email: yourname@yourblog.com)
4. Create a password
5. Choose your business name (your blog name)
6. Select your niche category
7. Add website URL (your blog)
Total time: 5 minutes. It’s free.

STEP 2: OPTIMIZE YOUR PROFILE
Your Pinterest profile is like a mini landing page. Make it count.
PROFILE PICTURE:
- Use your blog logo OR a professional headshot
- Square image, 165 x 165 pixels minimum
- Keep it simple and recognizable
DISPLAY NAME (60 characters):
- Format: “Your Name | Niche + Keywords”
- Example: “Linda Martinez | Budget Travel Tips for Seniors”
- Example: “Robert’s Workshop | Woodworking for Beginners”
- Include keywords people might search for
ABOUT/BIO (500 characters):
- First sentence: Who you help and how
- Second sentence: What they’ll find on your boards
- Third sentence: Call-to-action or website mention
- Include 2-3 relevant keywords naturally
Example bio:
“Hi! I’m Linda, and I help retirees travel Europe on a budget. Find travel tips, packing guides, senior-friendly destinations, and money-saving strategies for your next adventure. Visit my blog BudgetTravelAfter60.com for full guides and reviews!”
STEP 3: CLAIM YOUR WEBSITE
This verifies you own your blog and enables Rich Pins (extra details shown on your pins).
How to claim:
1. Go to Settings → Claim
2. Enter your website URL
3. Choose verification method (I recommend HTML tag – easiest)
4. Copy the meta tag Pinterest gives you
5. Paste it into your WordPress site (Yoast SEO → Webmaster Tools → Pinterest)
6. Click “Verify” in Pinterest
Your site should be verified within 24 hours.
STEP 4: ENABLE RICH PINS
Rich Pins automatically pull extra information from your blog posts (title, author, description).
How to enable:
1. Install Yoast SEO plugin (if not already installed)
2. Go to Yoast SEO → Social → Facebook → Enable Open Graph
3. Go to Pinterest Rich Pin Validator: developers.pinterest.com/tools/url-debugger
4. Enter one of your blog post URLs
5. Click “Validate”
6. If successful, click “Apply now”
Rich Pins = approved within 24-48 hours.
Why it matters: Rich Pins get 30% more clicks than regular pins.
STEP 5: CREATE YOUR FIRST 5 BOARDS
Boards are like folders that organize your pins by topic.
Board Strategy:
- Create 5-10 boards that align with your blog categories
- Each board should be specific enough to be useful
- Use keyword-rich board titles and descriptions
Example (Travel Blog):
1. “Budget Travel Tips for Seniors”
2. “Best European Destinations Over 60”
3. “Travel Packing Guides & Checklists”
4. “Senior-Friendly Hotels & Accommodations”
5. “Travel Gear & Accessories for Seniors”
How to create a board:
1. Click “Create” → “Board”
2. Add board name (use keywords!)
3. Write board description (150-300 characters with keywords)
4. Make board public
5. Save
Add 5-10 pins to each board to start (mix your content + curated content from others).
YOUR PINTEREST PROFILE CHECKLIST:
✅ Business account created
✅ Profile picture uploaded
✅ Display name optimized with keywords
✅ Bio written (500 characters, keyword-rich)
✅ Website claimed and verified
✅ Rich Pins enabled
✅ 5-10 boards created with descriptions
✅ 5-10 pins added to each board
Once complete, your profile is optimized for growth. Time to create pins!
CHAPTER 3: CREATING HIGH-CONVERTING PINS IN CANVA
You don’t need Photoshop. You don’t need design skills. You just need Canva (free version works great).
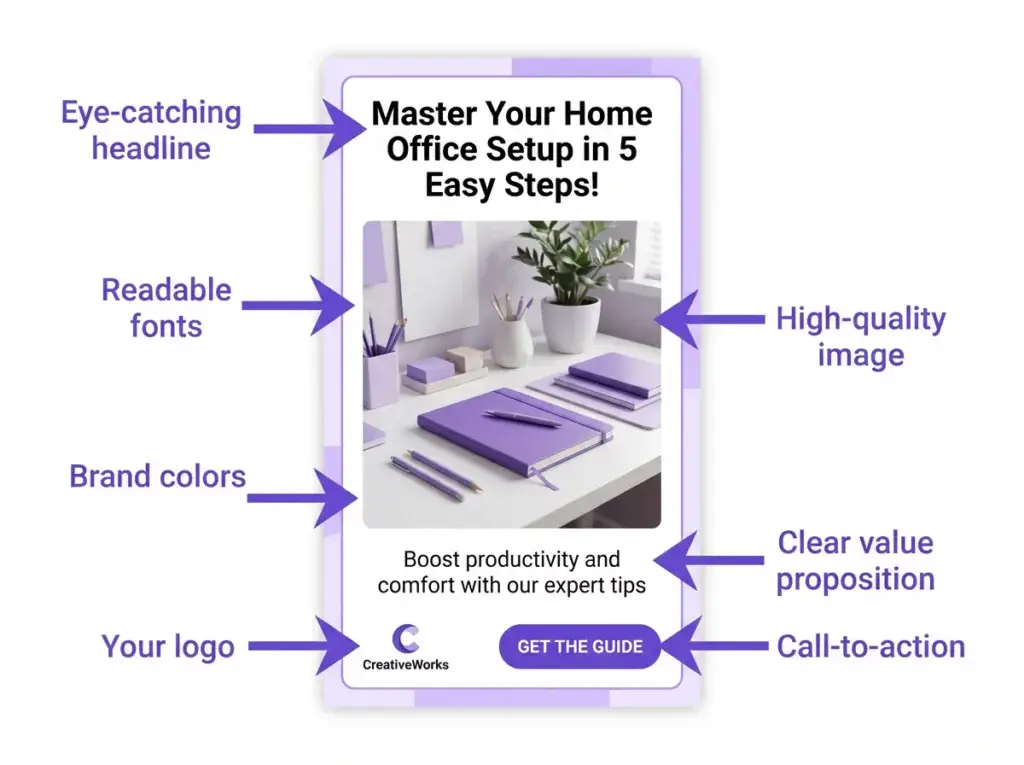
THE ANATOMY OF A HIGH-PERFORMING PIN
Before we create, let’s understand what makes a pin successful.
ELEMENT #1: VERTICAL FORMAT
- Optimal size: 1000 x 1500 pixels (2:3 ratio)
- Why: Takes up more screen space = more visibility
- Pinterest favors vertical pins in search results
ELEMENT #2: EYE-CATCHING IMAGE
- Bright colors perform better than muted tones
- Faces and lifestyle images get more engagement
- Avoid cluttered backgrounds
- High contrast = more clickable
ELEMENT #3: CLEAR, READABLE TEXT OVERLAY
- Large, bold headline (60-80% of pin space)
- Use high-contrast colors (dark text on light background or vice versa)
- Max 10-15 words on the entire pin
- Font size: 80-120pt for main headline
ELEMENT #4: BRANDING
- Small logo or website name in the corner
- Keeps your brand visible without being distracting
- Use consistent colors across all pins
ELEMENT #5: CALL-TO-ACTION (OPTIONAL)
- Simple CTA like “Read More,” “Get the Guide,” “Learn How”
- Creates urgency and encourages clicks
STEP-BY-STEP: CREATING YOUR FIRST PIN IN CANVA
Let’s create a pin for a blog post about “Best Walking Shoes for Seniors.”
STEP 1: OPEN CANVA
- Go to Canva.com (create free account if needed)
- Click “Create a design”
- Search “Pinterest Pin” (auto-sets to 1000x1500px)
- Blank canvas appears
STEP 2: ADD BACKGROUND
- Click “Elements” in the left sidebar
- Search “elderly woman walking” or “senior walking outdoors”
- Choose a bright, clear photo
- Drag to fill the entire canvas
- Adjust position if needed
STEP 3: ADD TEXT BOX FOR HEADLINE
- Click “Text” in left sidebar
- Choose “Add a heading”
- Type: “7 BEST WALKING SHOES FOR SENIORS (2026)”
- Drag text box to upper 2/3 of pin
- Resize to fill width
STEP 4: FORMAT TEXT
- Select text
- Change font (I recommend: Montserrat Bold, Oswald, or Bebas Neue)
- Increase size to 100-120pt
- Change color to white (if photo is dark) or black (if photo is light)
- Click “Effects” → Add black outline or drop shadow for readability
STEP 5: ADD SUBHEADING (OPTIONAL)
- Add another text box below headline
- Type: “Comfort + Support + Style”
- Smaller font (40-50pt)
- Same color as headline
STEP 6: ADD BRANDING
- Add text box in bottom corner
- Type your website: “AgelessRevenue.com”
- Small font (24-30pt)
- Subtle color (white with transparency or light gray)
STEP 7: DOWNLOAD
- Click “Share” → “Download”
- File type: PNG (best quality)
- Click “Download”
Total time: 5-10 minutes per pin once you get the hang of it.
PIN DESIGN BEST PRACTICES
DO:
✅ Use bright, saturated colors (oranges, teals, reds, purples)
✅ Keep text simple and large
✅ Use high-quality, clear images
✅ Create 2-3 pin variations per blog post (different images/text)
✅ Maintain consistent branding (colors, fonts, style)
DON’T:
❌ Use horizontal images (they get cropped weird)
❌ Put too much text (cluttered = skipped)
❌ Use tiny fonts (unreadable on mobile)
❌ Steal images from Google (copyright issues – use Unsplash, Pexels, Canva stock photos)
❌ Make every pin look identical (variety performs better)
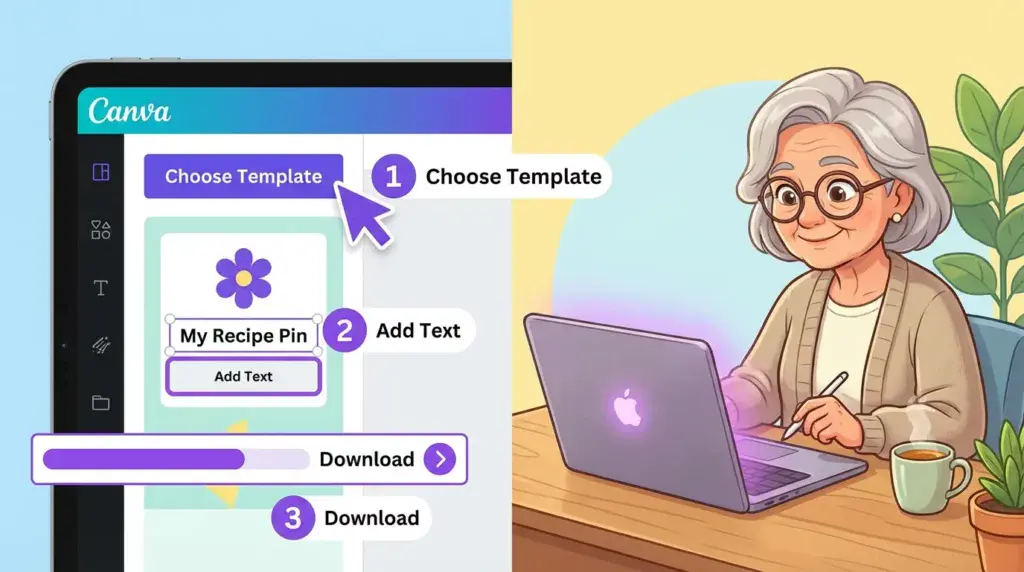
CANVA TEMPLATES FOR BEGINNERS
Don’t want to design from scratch? Use templates!
In Canva:
1. Search “Pinterest Pin” in templates
2. Browse thousands of pre-made designs
3. Click one you like
4. Customize: swap photo, change text, update colors
5. Download
My favorite Canva template styles for affiliate pins:
- List-style (e.g., “7 Best…”)
- Before/After comparisons
- Quote cards with lifestyle images
- Problem/Solution format
- Number + Benefit (e.g., “10 Ways to…”)
TIME-SAVING TIP: Create 10 Pins at Once
Instead of creating 1 pin when you publish a blog post, batch create pins.
Dedicate 2-3 hours once per week:
- Create 10-15 pins for your recent blog posts
- Schedule them to post throughout the week
- You’ll have consistent pins without daily work
CHAPTER 4: PINTEREST SEO – GETTING YOUR PINS DISCOVERED
Pinterest is a search engine. That means SEO (Search Engine Optimization) matters.
Here’s how to optimize your pins so people actually find them.
WHERE TO ADD KEYWORDS
Pinterest looks at 4 places for keywords:
1. PIN TITLE (100 characters)
2. PIN DESCRIPTION (500 characters)
3. BOARD NAME
4. BOARD DESCRIPTION
Let’s optimize each one.
PIN TITLE OPTIMIZATION
Your pin title should:
- Include your main keyword
- Be clear and specific
- Create curiosity or urgency
- Be 60-100 characters
EXAMPLES:
❌ Bad: “Check Out These Shoes”
✅ Good: “7 Best Walking Shoes for Seniors with Plantar Fasciitis (2026)”
❌ Bad: “Travel Tips”
✅ Good: “Budget Travel Tips for Seniors: 15 Ways to Save Money in Europe”
❌ Bad: “Woodworking Project”
✅ Good: “Easy Woodworking Projects for Beginners: Build a Bookshelf in 1 Day”
Formula: [Number] + [Adjective] + [Main Keyword] + [Benefit or Specificity]
PIN DESCRIPTION OPTIMIZATION
This is where you provide more context and include secondary keywords.
Structure:
- First sentence: What the pin is about (include main keyword)
- Second sentence: What they’ll learn or get (include benefit)
- Third sentence: Call-to-action (click, read, learn more)
- Sprinkle in 2-3 related keywords naturally
- Add 3-5 relevant hashtags at the end
EXAMPLE (Walking Shoes Pin):
“Discover the 7 best walking shoes for seniors with plantar fasciitis in 2026. These comfortable, supportive shoes provide excellent arch support, cushioning, and pain relief for all-day wear. Perfect for seniors who love walking, travel, or daily activities. Read the full review with pros, cons, and where to buy! #seniorshoes #walkingshoes #plantarfasciitis #seniorfitness #comfortableshoes”
Character count: 398 (under 500 limit ✓)
Keywords included: walking shoes, seniors, plantar fasciitis, arch support, cushioning, pain relief ✓
Hashtags: 5 relevant tags ✓
KEYWORD RESEARCH FOR PINTEREST
How do you find the right keywords? Use Pinterest’s own tools.
METHOD #1: PINTEREST SEARCH BAR
- Type your main keyword into Pinterest search
- Pinterest auto-suggests popular searches
- Note these suggestions – they’re exactly what people are searching for
Example: Type “gardening for seniors”
Auto-suggestions:
- gardening for seniors ideas
- gardening for seniors raised beds
- easy gardening for seniors
- container gardening for seniors
Use these exact phrases in your pin titles and descriptions!
METHOD #2: RELATED SEARCHES
- After searching, scroll down
- Pinterest shows “Related searches” bubbles
- Click each one to see more specific keywords
- Note 10-15 relevant keywords for your niche
METHOD #3: PINTEREST TRENDS TOOL
- Go to trends.pinterest.com
- Enter your niche keywords
- See search volume trends over time
- Identify growing vs. declining keywords
TARGET KEYWORD STRATEGY
For each pin, choose:
- 1 PRIMARY keyword (main focus)
- 2-3 SECONDARY keywords (related terms)
- 3-5 HASHTAGS (broader topic tags)
Example (Travel Blog Post about Paris):
Primary: “senior-friendly hotels Paris”
Secondary: “Paris hotels for seniors,” “accessible Paris accommodations,” “budget Paris hotels over 60”
Hashtags: #ParisTravel #SeniorTravel #BudgetTravel #EuropeTravel #TravelOver60
Use primary keyword in pin title. Use all keywords naturally in description.
BOARD OPTIMIZATION
Your boards also need keyword optimization.
BOARD NAME:
- Use clear, searchable keywords
- Be specific, not generic
❌ Bad: “Travel Stuff”
✅ Good: “Budget Travel Tips for Seniors Over 60”
❌ Bad: “Recipes I Like”
✅ Good: “Easy One-Pot Meals for Seniors”
BOARD DESCRIPTION (150-300 characters):
- Explain what the board contains
- Include 3-5 relevant keywords
- Make it helpful and searchable
Example:
“Find budget-friendly travel tips, money-saving strategies, and affordable destination guides for seniors over 60. Discover how to travel Europe, Asia, and the U.S. on a retiree’s budget without sacrificing comfort or experiences.”
CHAPTER 5: YOUR 7-DAY PINTEREST QUICK-START STRATEGY
Let’s get you up and running with a simple 7-day plan.
DAY 1: SET UP YOUR ACCOUNT
- Create Pinterest Business account (15 minutes)
- Optimize profile (30 minutes)
- Claim website (10 minutes)
- Enable Rich Pins (15 minutes)
Total time: 1 hour
DAY 2: CREATE 5 BOARDS
- Brainstorm 5-10 board topics related to your niche
- Create boards with keyword-optimized titles
- Write descriptions for each board (150-300 characters)
- Make boards public
Total time: 45 minutes
DAY 3: CURATE CONTENT (FILL YOUR BOARDS)
- Find 50-100 relevant pins from other creators
- Save 10-15 pins to each of your boards
- Mix of: blog posts, infographics, how-tos, product guides
- This establishes your boards as active and valuable
Total time: 1-2 hours
DAY 4: CREATE YOUR FIRST 5 PINS
- Choose 2-3 blog posts to promote
- Create 2-3 pin variations per post in Canva
- Download as PNG files
- Total: 5-10 pins ready to post
Total time: 2 hours
DAY 5: UPLOAD AND OPTIMIZE PINS
- Upload your 5-10 pins to Pinterest
- Add keyword-optimized titles
- Write detailed descriptions (300-500 characters)
- Add 3-5 hashtags
- Save to relevant boards
Total time: 1 hour
DAY 6: JOIN 5-10 GROUP BOARDS
- Search for group boards in your niche
- Request to join (check board description for instructions)
- Once accepted, share your pins to group boards for extra reach
Total time: 45 minutes
DAY 7: CREATE POSTING SCHEDULE
- Decide how often you’ll pin (start with 5-10 pins per day)
- Manually pin 5 pins today (mix: your pins + curated pins)
- Plan next week: create 5-10 new pins for upcoming blog posts
Total time: 30 minutes
BY END OF WEEK 1:
✅ Pinterest Business account fully set up and optimized
✅ 5-10 keyword-rich boards created
✅ 50+ curated pins saved (shows active boards)
✅ 5-10 original pins created and posted
✅ Joined 5-10 group boards for extra reach
✅ Posting schedule established
Expected results Week 1: 20-100 pin impressions, 5-30 website clicks.
Don’t expect massive traffic yet. This is foundation-building.
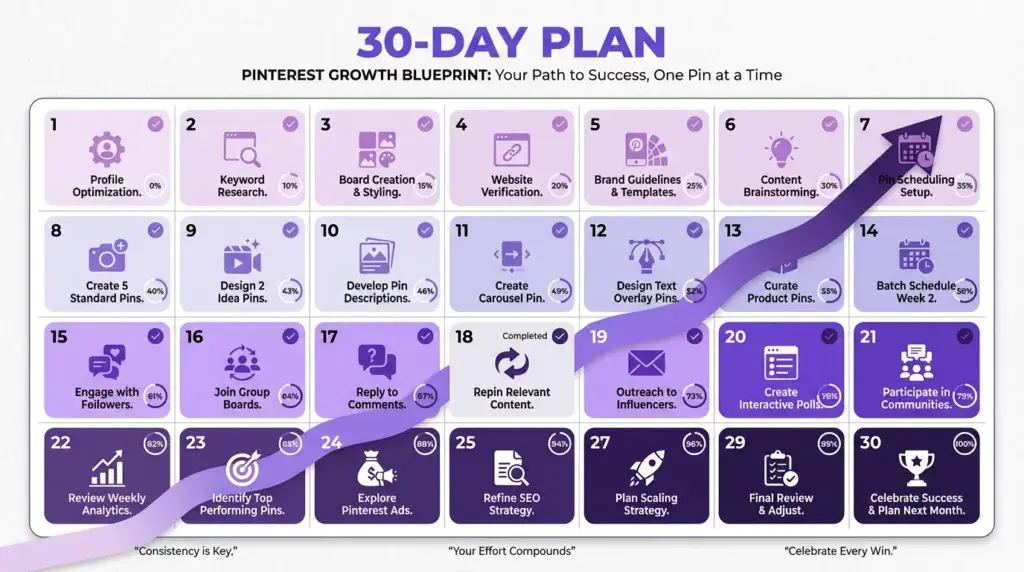
CHAPTER 6: 30-DAY AND 90-DAY PINTEREST GROWTH PLANS
Let’s scale from Week 1 foundation to consistent traffic.
30-DAY PLAN: BUILDING MOMENTUM
WEEK 1-2: FOUNDATION (covered above)
- Account setup
- Create 5-10 boards
- Create first 10-15 pins
- Start pinning 5-10 pins per day
WEEK 3-4: CONSISTENCY
- Publish 2-3 new blog posts
- Create 3-5 pins per new post (total: 6-15 new pins)
- Continue pinning 5-10 per day (mix: your pins 50% + curated pins 50%)
- Join 5-10 more group boards
- Monitor Pinterest Analytics: which pins are performing? Double down on that style/topic
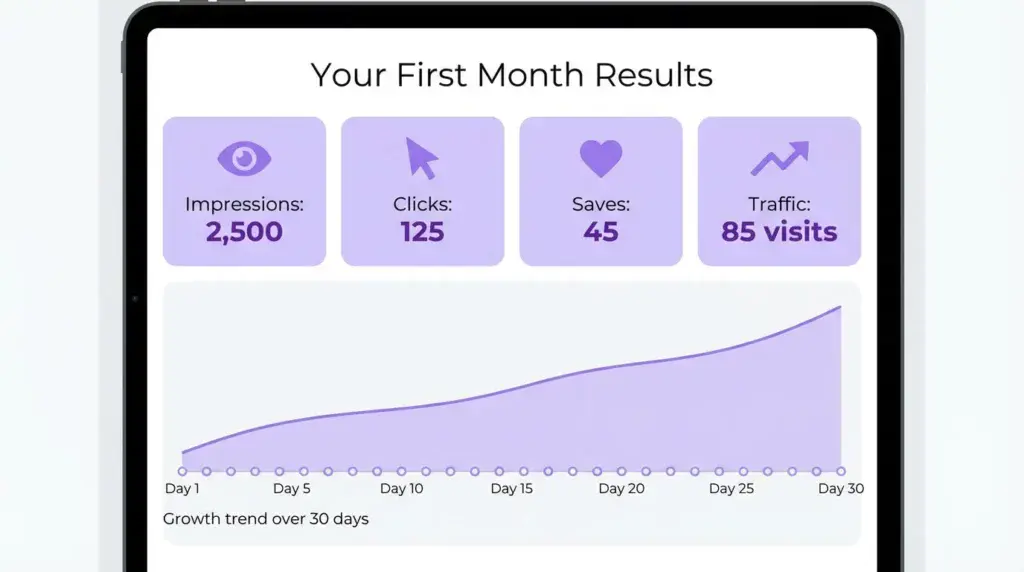
METRICS TO TRACK (MONTH 1):
- Total impressions: Goal 1,000-5,000
- Outbound clicks (traffic to your blog): Goal 50-200
- Saves: Goal 20-100
- Pins created: Goal 20-30
REALISTIC MONTH 1 RESULTS:
- 100-500 website visitors from Pinterest
- 1,000-5,000 pin impressions
- 10-50 saves and repins
- $0-50 in affiliate income (traffic is low, but it’s starting!)
Don’t get discouraged if numbers are low. Month 1 is planting seeds. Growth comes Months 2-6.
90-DAY PLAN: EXPONENTIAL GROWTH
MONTH 2: MOMENTUM PHASE
Focus:
- Publish 8-12 new blog posts
- Create 30-50 new pins (3-5 per post)
- Pin 10-15 per day consistently
- Experiment with pin styles: see what performs best
- Re-pin your top-performing pins to multiple boards
Metrics:
- Impressions: 5,000-15,000
- Clicks: 200-500
- Saves: 100-300
Expected traffic: 500-1,500 visitors from Pinterest
MONTH 3: SCALING PHASE
Focus:
- Publish 8-12 new blog posts
- Create 40-60 new pins
- Pin 15-20 per day
- Consider Tailwind ($9.99/month) for scheduling (saves time)
- Update older pins: create new variations for older blog posts
- Focus on seasonal content (plan 2-3 months ahead)
Metrics:
- Impressions: 15,000-50,000
- Clicks: 500-2,000
- Saves: 300-1,000
Expected traffic: 1,500-5,000 visitors from Pinterest
Expected income: $100-500 in affiliate commissions
BY END OF 90 DAYS:
✅ 60-100 pins created and published
✅ 10-15 active boards
✅ 20-30 blog posts with Pinterest traffic
✅ 2,000-5,000 monthly visitors from Pinterest
✅ Pinterest Analytics showing clear growth trends
✅ $100-500 monthly affiliate income
This is when Pinterest momentum really kicks in. Months 4-12 are where exponential growth happens.
CHAPTER 7: COMMON MISTAKES SENIORS MAKE (AND HOW TO AVOID THEM)
After coaching hundreds of seniors through Pinterest, I’ve seen the same mistakes repeatedly. Let’s avoid them.
MISTAKE #1: CREATING ONLY 1 PIN PER BLOG POST
Why it’s a mistake:
- Different pin styles appeal to different people
- Testing 3-5 variations per post lets you see what resonates
- More pins = more chances to be discovered
Solution:
Create 3-5 pin variations for EVERY blog post:
- Variation 1: Different headline angle
- Variation 2: Different image
- Variation 3: Different color scheme
- Variation 4: List format vs. question format
- Variation 5: Minimal design vs. text-heavy
Example (Blog post: “Best Walking Shoes for Seniors”):
Pin 1: “7 Best Walking Shoes for Seniors with Plantar Fasciitis”
Pin 2: “Struggling with Foot Pain? Try These Senior-Friendly Shoes”
Pin 3: “Comfortable Walking Shoes for Seniors (2026 Reviews)”
Pin 4: “Say Goodbye to Foot Pain: Top-Rated Shoes for Seniors”
Pin 5: “The ONLY Walking Shoes You Need After 60”
Test them all. The Pinterest algorithm will favor the best-performing one.
MISTAKE #2: PINNING ONLY YOUR OWN CONTENT
Why it’s a mistake:
- Looks spammy and self-promotional
- Pinterest favors accounts that curate valuable content from various sources
- You won’t build an engaged following if you only self-promote
Solution:
Follow the 80/20 rule:
- 80% curated content (pins from others in your niche)
- 20% your own content (links to your blog)
When curating:
- Pin genuinely helpful content your audience will love
- Pin from a variety of sources (not just one blog)
- Add your own commentary in the description
This builds your boards’ authority and helps Pinterest see you as a valuable curator, not just a marketer.
MISTAKE #3: INCONSISTENT PINNING
Why it’s a mistake:
- Pinterest rewards consistency over intensity
- Pinning 50 pins one day, then nothing for 2 weeks = algorithm penalizes you
- Growth stalls without steady activity
Solution:
Pin 5-15 pins EVERY DAY. Consistency > volume.
Better to pin 5 pins daily (35 per week) than 35 pins on Monday and nothing else all week.
Use scheduling tools to help:
- Tailwind ($9.99/month): Best Pinterest scheduler, automates pinning
- Pinterest’s built-in scheduler (free): Manual but works
Set up:
- Schedule 5-10 pins per day in advance
- Space them out (every 2-3 hours)
- Mix your content with curated content
MISTAKE #4: IGNORING PINTEREST ANALYTICS
Why it’s a mistake:
- You don’t know what’s working vs. what’s flopping
- Wasting time creating pins that don’t perform
- Missing opportunities to double down on winners
Solution:
Check Pinterest Analytics weekly (takes 10 minutes):
Go to Analytics → Overview:
- Top pins: Which get the most impressions? Create more like those!
- Top boards: Which boards are popular? Add more pins there!
- Outbound clicks: Which pins drive traffic? Replicate that style!
- Audience: What keywords are people using to find you?
Make decisions based on data, not guesses.
MISTAKE #5: USING LOW-QUALITY OR STOLEN IMAGES
Why it’s a mistake:
- Blurry, pixelated images get ignored
- Stolen images can get your account suspended
- Low-quality = low trust = no clicks
Solution:
Use high-quality, copyright-free images:
- Unsplash.com (free, high-quality stock photos)
- Pexels.com (free stock photos)
- Canva stock library (free with Canva account)
- Your own photos (if high quality)
Never:
❌ Right-click save images from Google
❌ Screenshot other people’s pins
❌ Use blurry or low-resolution photos
MISTAKE #6: GIVING UP TOO SOON
Why it’s a mistake:
- Pinterest growth is SLOW for the first 2-3 months
- Most people quit right before momentum kicks in
- You need 60-90 days minimum to see real results
Solution:
Commit to 6 months before judging results.
Typical growth curve:
- Month 1: 50-200 visitors (discouraging, but expected)
- Month 2: 200-500 visitors (slow growth)
- Month 3: 500-1,500 visitors (momentum starting)
- Month 4: 1,500-3,000 visitors (algorithm recognizing you)
- Month 5-6: 3,000-8,000 visitors (exponential growth phase)
If you quit at Month 2 because “it’s not working,” you’ll miss the exponential growth of Months 4-6.
Stay consistent. Results WILL come.
CHAPTER 8: ADVANCED STRATEGIES (ONCE YOU HAVE MOMENTUM)
Once you’re getting 2,000+ monthly visitors from Pinterest (typically Month 4-6), try these advanced tactics:
STRATEGY #1: SEASONAL CONTENT PLANNING
Pinterest users plan ahead. They search for:
- Christmas content in October
- Summer travel in March
- Tax tips in December
Create content 2-3 months before the season:
- January-February: Create spring cleaning, gardening, Easter content
- April-May: Create summer travel, BBQ, outdoor content
- July-August: Create back-to-school, fall recipes, Halloween content
- October-November: Create holiday gift guides, winter travel, New Year content
Plan 90 days ahead, and you’ll catch the seasonal traffic wave.
STRATEGY #2: VIDEO PINS (IDEA PINS)
Video pins (called Idea Pins) get 3X more engagement than static pins.
Don’t worry—these aren’t complicated.
Simple video pin ideas:
- Screen recording showing a process (e.g., “How to use Canva to create Pinterest pins”)
- Slideshow of images with text overlay (Canva makes this easy)
- Quick tip or hack (15-30 seconds)
You don’t need fancy editing. Just helpful content in video format.
STRATEGY #3: PIN RECYCLING
Your best-performing pins can be re-pinned multiple times.
How to recycle:
- Every 3-4 months, re-pin your top 20 pins
- Slight variation: change the description or board
- Space out recycled pins (don’t spam)
Why it works:
- New users haven’t seen your old pins
- Pinterest gives older pins a fresh boost when re-pinned
- Maximizes ROI on content you already created
STRATEGY #4: COLLABORATE WITH OTHER PINNERS
Join collaborative group boards or create your own.
Benefits:
- Expose your pins to a larger audience
- Mutual support (you pin theirs, they pin yours)
- Builds community
How to find group boards:
- Search “[your niche] + group board” on Pinterest
- Use PingroupIe.com to find active group boards
- Request to join (follow board instructions)
CHAPTER 9: PINTEREST + AFFILIATE MARKETING BEST PRACTICES
Let’s talk about the intersection of Pinterest and affiliate links.
CAN YOU POST AFFILIATE LINKS DIRECTLY ON PINTEREST?
Technically yes, but I don’t recommend it.
Pinterest’s policy:
- Affiliate links are allowed
- But Pinterest prioritizes pins that link to helpful content, not direct product pages
Better strategy:
✅ Pin links to your BLOG POST (which contains affiliate links)
❌ Don’t pin direct Amazon affiliate links
Why?
- Blog posts provide value, context, and reviews
- People trust blog recommendations more than ads
- Pinterest algorithm favors content over product links
- Your blog builds YOUR audience (email list, repeat visitors)
DISCLOSURE REQUIREMENTS
FTC requires disclosure when you earn commissions.
On Pinterest:
- Add disclosure in pin description: “This post contains affiliate links.”
- Keep it simple and honest
On your blog:
- Clear disclosure at top of post: “This post may contain affiliate links. I earn a commission if you purchase through my links at no extra cost to you.”
WHICH AFFILIATE PRODUCTS TO PIN
High-performing affiliate pin topics:
- Product roundups (“7 Best…”)
- Comparison posts (“X vs. Y: Which is Better?”)
- How-to guides with tool recommendations
- Gift guides (seasonal)
- Problem-solution posts (“Struggling with X? Try these…”)
Low-performing:
- Generic product pins with no context
- Direct sales pitches
- Low-value items under $10 (too small commissions to be worth effort)
CONCLUSION: YOUR PINTEREST ACTION PLAN STARTING TODAY
You now have everything you need to drive thousands of targeted visitors from Pinterest to your affiliate blog.
Here’s your action plan: Get the free Starter Kit:
THIS WEEK:
✅ Set up Pinterest Business account (Day 1)
✅ Create 5-10 boards with keyword-optimized titles and descriptions (Day 2)
✅ Create your first 10 pins in Canva (Days 3-4)
✅ Start pinning 5-10 pins per day (Days 5-7)
THIS MONTH:
✅ Publish 8-12 blog posts with affiliate links
✅ Create 3-5 pins per blog post (total 30-50 pins)
✅ Pin consistently: 5-15 per day
✅ Join 5-10 group boards
✅ Check analytics weekly: track what’s working
MONTHS 2-3:
✅ Continue publishing 8-12 blog posts per month
✅ Create 40-60 new pins per month
✅ Pin 10-20 per day consistently
✅ Experiment with pin styles and formats
✅ Re-pin top performers
MONTHS 4-6:
✅ Watch traffic grow exponentially
✅ Add seasonal content 2-3 months ahead
✅ Try video pins (Idea Pins)
✅ Recycle top-performing pins
✅ Celebrate hitting 5,000-10,000 monthly visitors!
FINAL THOUGHTS
Pinterest changed my affiliate business. I went from 200 blog visitors per month (mostly from Google) to 8,500 visitors per month—primarily from Pinterest—in just 6 months.
That traffic converted to $400-800 in monthly affiliate commissions, which has now grown to $2,000+ per month.
And I’m not special. I’m 67 years old, a former teacher with zero design experience and minimal social media skills.
If I can do this, you absolutely can too.
The key is consistency. Pin 5-15 pins every single day for 90 days. That’s it.
Most people quit after 30 days because they don’t see “results.” But the magic happens in Months 3-6 when the Pinterest algorithm finally recognizes your consistency and rewards you with exponential reach.
So start today. Set up your account. Create your first 5 pins. Pin them consistently.
Three months from now, you’ll thank yourself for starting.
Let’s build this together. 🚀
READY TO GET STARTED?
Download your FREE Pinterest starter pack:
✅ 10 Canva pin templates (ready to customize)
✅ Pinterest SEO keyword checklist
✅ 30-day posting schedule
✅ Pin description templates (copy-paste ready)
Next Steps:
1. Complete Week 1 setup (7 days)
2. Create your first 10 pins
3. Start pinning daily
4. Track progress in Pinterest Analytics
Questions? Email: gila@AgelessRevenue.com
Welcome to your Pinterest traffic journey!
Quick References (Official Links)
Pinterest: How to Create Pins for Business:
Pinterest Trends tool:
Pinterest Analytics help:
Canva download help